Two low-carb, gluten-free, ‘Pioppi-Style’ pizzas – Caramelised Red Onion with Two Cheeses, & Margherita

Two ‘Pioppi-Style’ pizzas – served with Purple Majesty potato wedges roasted in avocado oil.
This recipe makes pizza healthy eating! I call them – ‘Pioppi-Style’ Pizzas – because this recipe was originally inspired by a one that I found in a fantastic new book on healthy, Mediterranean-style eating called ‘The Pioppi Diet’ – by top London cardiologist Dr Aseem Malhotra.
It’s a terrific low-carb, gluten-free pizza base using courgettes – which was a revelation to me! They are much nicer-tasting than any of the cauliflower versions I’ve tried and like most gardeners – I have plenty of courgettes at this time of year and I’m always looking for new ways to use them!
You can make these bases very easily and top them with anything you like. Today I’ve made a Pizza Margherita and another which is a Caramelised Red Onion and 2 cheese pizza (or 3 in today’s ase, as I also used some of my own home made kefir cheese.
I’ve tweaked the Pioppi recipe a little bit by blitzing the courgette in a food processor rather than grating it and by draining it for longer. I also added another ingredient – Chia seed – which makes it slightly easier to handle as it absorbs moisture and sticks things together a bit like egg. It’s often used in vegan baking as an egg replacement. Chia seed also makes the recipe even healthier by adding heart-healthy omega-3 fats and more fibre.
These pizzas are a great way to up your veg and fibre intake without feeling deprived! They’re also much healthier than the usual pizza made with a flour base if you’re trying to lower your blood sugar, as refined carbs like wheat flour pizza bases are high in carbohydrate and are basically turned into sugar by the body when you eat them – so they raise you’re blood sugar.
Being flour-free, this recipe is also useful if you want to avoid gluten.
They’re just the thing for pizza nights or the Halloween parties coming up soon! They’re also perfect cold for picnics or sneaking into your kids lunch boxes – they won’t even know these are healthy and their friends will be jealous!
From the tunnel I’ve used: courgettes – but if you don’t grow your own courgettes they’re easily available everywhere all year round. Also from the tunnel – one of the toppings uses tomatoes, onions and garlic and herbs in the sauce and the other topping uses homegrown red onions, with Cashel Blue cheese and goats cheese. Also in this one I’ve also used some of my homemade kefir curd cheese. I’ve also used organic eggs from our hens which eat a lot of greens from the polytunnel all year round.
This is not the fastest recipe to make I’ll grant you! Like any recipe, it takes longer time the first time you make it! It may seem a bit of a faff but I promise you that it’s well worth it! I’ve experimented a lot with the recipe over the last few weeks and have discovered that if you’re short of time – you can break up the preparation time by doing many of the different stages in advance, when you have time. Then you can cook it later when you want to eat it. It can be started the day before or made ahead and reheated. It can also even be frozen and re-heated! It’s extremely versatile. You could also make a batch and freeze a few cooked bases for topping with anything when you want a meal in a hurry. I’ve marked the various stages where you can stop and do the rest of the recipe later with an asterisk*
These are real ‘convenience food’ at it’s best – made super-healthy!
The pizzas are very filling and normally only need a light green salad as an accompaniment – but as it was National Potato Day on 6th October – Gerry Kelly asked me to do something for that. So I served them with a side of roasted Purple Majesty potato wedges from the garden. These were made healthier by steaming, cooling and then roasting in avocado oil, which is one of the healthiest oils to use for cooking as it is more ‘heat-stable’ at high temperatures – having a very high ‘smoke point’. This means that it can be used for high-temperature cooking like frying or roasting without producing unhealthy compounds which some oils may do.
Purple Majesty potatoes are the healthiest potato you can eat. Studies have shown that the anthocyanin phytonutrients they contain, which give them their purple colour, are good for circulation and can also lower blood sugar. Cooking by steaming and also without peeling means you don’t lose any of the many nutrients which are mostly in or just below the skins and retaining the skins also naturally makes them higher in gut-friendly fibre.
Equipment;
You’ll need a grater or a food processor to blitz the courgettes – a food processor is much faster and easier though and also doesn’t grate fingers if you’re clumsy like me!
A jelly bag if possible – most people who make jam will have one of these. Or you can use strong cheese muslin – I have both of those as I use them for making cheese. (I prefer them to the tea towel mentioned in the original recipe as I like my food without possible races of detergent! But if that doesn’t bother you – then you can use one of those!)
Two same-sized silicone non-stick baking sheets are best for this recipe, as I find it can be inclined to stick to grease-proof paper. Absolutely nothing sticks to those baking sheets and they make it so much easier to do the slightly tricky turning over bit! You can find them everywhere now – Home Store & More here in Ireland have them very cheaply and although they may seem a bit of an investment at around €4 each – I can guarantee you’ll use them again and again, they last forever and they’re brilliantly easy to clean – just rinse under the tap!
Two large-ish flat metal baking sheets. It helps if these are both roughly the same size as the silicone sheets – as half way through cooking you will be flipping over the bases.
Recipe:
Serves 2-4 depending on whether it’s supper with added extras or just a light snack.
Ingredients:
1lb 4oz -1lb 8oz or 580-680g of courgette – grated or blitzed to a large crumb size.
(The original recipe specified 4 large courgettes but although the amount is a bit flexible – what ever you or I might call a large size courgette is very subjective and difficult to determine! It could even be almost a marrow! So I experimented a lot with this to work the quantity out on a more reliable weight basis. That’s much easier – especially if you have to buy them! (The problem with a watery veg like courgette is if you have too much grated courgette because you’re not sure what ‘large’ actually is – you could end up with a sauce or even soup which definitely won’t make a pizza base! I was surprised to find that almost 3/4 pint or 400ml of liquid came out of 1lb 8 oz of courgette after 4 hours draining!)
A rounded 1/2 teaspoon of sea salt – (don’t worry about the amount of salt as this will dissolve and come out with the liquid and you won’t taste it)
50g Ground almonds/almond flour
50g Parmesan cheese – finely grated
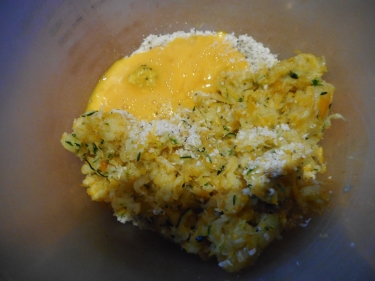
1 large egg – lightly beaten
1 tablespoon of Chia seeds (this is the ingredient which I added to the original recipe – as it helps the mixture to stick together more and also adds more healthy nutrients)
A few pinches of dried oregano or pizza herbs
Pizza Toppings:
1. For the Margherita Pizza 1 – I used some of my Totally Terrific Tomato sauce, reduced a bit more until fairly thick & spreadable – you can find the recipe for that here: http://nickykylegardeni
2. For the Caramelised onion and two (or 3) cheese pizza 2 – I’ve used caramelised red onions (again useful to keep in the fridge with all sorts of delicious uses – method below). I’ve dotted that with some crumbled Cashel Blue cheese and goat’s cheese (I also used some home-made kefir curd cheese as it has a nice ‘tangy’ taste that contrasts well with the onions – you can find the method for making my kefir cheese here: http://nickykylegardeni
To make the caramelised red onions: Finely slice 3-5 halved large red onions, cook slowly and very gently in 2-3 tablespoons of olive oil until all the liquid is gone and the onions are very soft. This can take about 3/4 of an hour. Stir occasionally to prevent sticking and possible burning. A ceramic non-stick, heavy-based frying pan is good for doing this. Then try to stop yourself eating them until you need some of them for the pizza! This is the most difficult bit – but you won’t need all of them for the pizza – so what you do with the rest is up to you!!
 |
 |
| 1. Grate or pulse-blitzed courgette for pizza base | 2. Add egg to the other pizza base ingredients & mix thoroughly |
 |
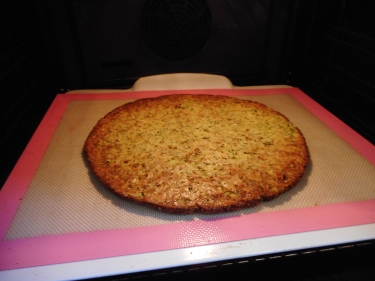 |
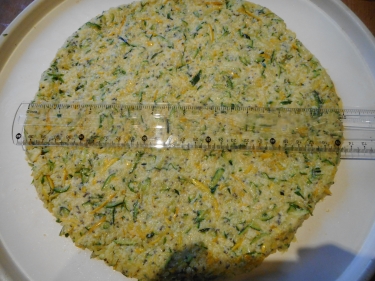
| 3,4,5,6,7. Flatten out mix evenly & shape to make no larger than 10 inch pizza or 2 smaller & bake | 7a. Pizza base turned & doing it’s second baking in oven |
 |
 |
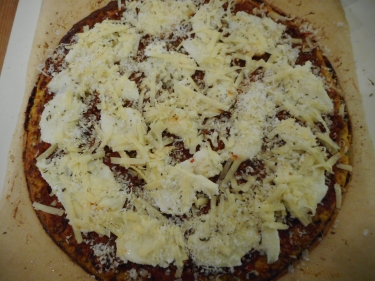
| 8a Adding toppings to Margherita pizza – Mozzarella, Cheddar & Parmesan with light sprinkle of dried oregano | 8b Adding toppings to base for Caramelised onion, Cashel Blue & kefir cheese pizza |
 |
 |
| 9a Cooked Margherita pizza hot from the oven | 9b Caramelised red onion, Cashel Blue & kefir cheese pizza after cooking – a few rough edges! |
Method:
For the bases:
1. Grate the courgettes on a coarse grater or blitz them to coarse, crumb-like structure in a food processor. I prefer blitzing as I think the mix is more even and find using the ‘pulse’ setting is best to achieve the coarse crumbs. Be careful not to process them too finely – you don’t want to end up with courgette spread! Put it all in bowl, sprinkle it with the salt – get your hands in and massage the salt in lightly to distribute it through the courgette or use a fork if you must. Cover and put in the fridge for a few hours to let the salt draw the liquid out of the courgette. The longer you leave it the more liquid will come out. (The original recipe says 5 minutes – but I think longer is better – I’ve left it for several hours sometimes if I’m busy).
2. Turn the courgette out of the bowl and into a jelly bag or cloth. Wring it out as tightly as possible until you can’t squeeze out any more liquid. Use immediately in the recipe, or *at this point you can leave it overnight in the fridge in a covered bowl.
3. Turn the oven on to 180 deg C or 160 deg C fan (I have a fan oven which tends to be on the hot side – any hotter than this may burn it, from experience of doing it many times). Next put the wrung-out courgette into a dry bowl, add all the other ingredients for the base and mix them thoroughly together.
4. Put one silicone sheet on top of one of the flat metal baking sheets and grease it very lightly with olive oil. (tipping a bit into your hand and smearing it lightly over is the easiest way as you don’t want too much. You can use silicone baking paper if you want – but I promise you silicone baking sheets are SO much easier!)
5. Bring the courgette mix together by hand, squeezing it together like play-dough, and tip it out onto the baking sheet. Flatten it down by hand and shape it to size. (You can either halve the mixture and shape it into two roughly evenly-sized small pizza bases – or you can make make one large 10 inch base.) It doesn’t matter what shape they are – but don’t make the bigger one any larger than 10 inches or it will be too thin and will not hold together! (*At this point you can delay finishing the pizza until later).
6. Bake in the oven for 25 minutes – they will look as if they’re browning quite a lot at the edges but don’t worry – they won’t burn – they’ll be crisp and delicious! Then comes the slightly tricky bit if you’re making the big single one! Take it out of the oven and put the other silicone sheet on top, then the other metal baking sheet on top of that – then very quickly turn them upside down, so that what was the top is now the bottom of the 1/2 cooked base. Peel the silicone sheet off the top carefully – peeling is better than lifting.
(If you’re making 2 smaller bases, you can carefully flip these over with a large egg slice if you’re not as clumsy as me – but I still think doing it my way is much easier. Even if they do happen to break up though – you can roughly stick them back together again and nobody will know once you’ve put the topping on!…Anyway – the roughly-made, ‘Artisanal’ look is all the rage right now!)
7. Return to the oven again for another 15 minutes. (*At this point you can cool the base if you like and top it before cooking later)
8. Remove from the oven – and if finishing the pizza straight away – leave the oven on and cover the bases with your topping of choice, returning it to the oven for about another 10 minutes or so until the cheese has melted. The cheese won’t brown much without over-cooking the base – but if you’re desperate for browned cheese – you can always brown it very carefully under the grill or use one of those fancy blow-torches!
Toppings:.
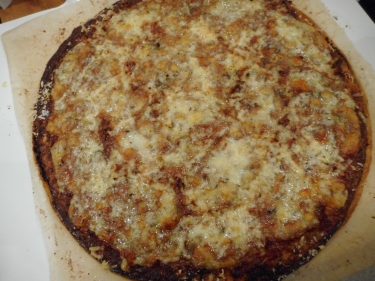
8 a. Pizza 1 – The Margherita pizza – smear with some thick tomato sauce, dot with some sliced or grated mozzarella, sprinkle with some dried oregano or other pizza herbs and return to the oven.
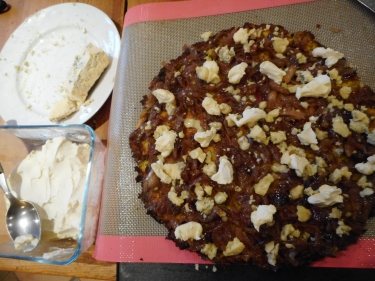
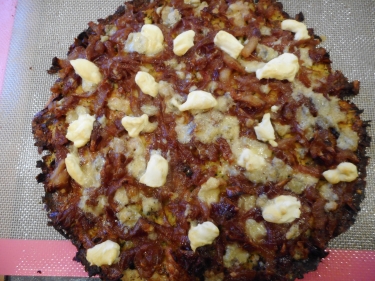
8 b. Pizza 2 – Caramelised red onion with Cashel Blue and goat’s cheese pizza (in my case also kefir cheese) Just scatter some of the onion evenly over the pizza and again dot with small pieces of the cheeses.
(To make the caramelised red onions: Finely slice 3-5 halved large red onions, cook slowly and very gently in 2-3 tablespoons of olive oil until all the liquid is gone and the onions are very soft. This can take about 3/4 of an hour. Stir occasionally to prevent sticking and possible burning. A ceramic non-stick, heavy-based frying pan is good for doing this. (Then try to stop yourself eating them until you need some of them for the pizza – this is the most difficult bit – but you won’t need all of them for the pizza – so what you do with the rest is up to you!!) I often batch cook these when I have time as they are so useful in many dishes and will last about a week in the fridge.
9. Both pizzas are nice served slightly cooled and garnished with a few fresh basil leaves if liked, accompanied by a crunchy green salad and/or a few roasted potato wedges. (In picture 9. – the caramelised onion & cheese one had rough edges as it fell apart halfway through cooking when I turned it over and was squashed back together again – so don’t worry if that happens! In fact the edge of the pizza was even more crunchy and delicious – but I’m a control-freak and like neat edges!)
This pizza is not too easy to eat in your hand when it’s very hot as it’s slightly softer than normal – so you can be polite and eat it with a knife and fork if you want! But for some reason – like many things – pizza tastes nicer out of the hand and you can easily pick it up and eat it in your hand when it’s cooled just a little or if it’s cold. (Wringing as much of the liquid out from the grated or blitzed courgette at stage 2. is key here – the more liquid you get out – the firmer the base will be after cooking. This is great exercise for the upper arms girls!)
You can eat these cold – when they are truly irresistible! Great for lunchboxes and picnics!
Or you can cool, refrigerate when cool and re-heat them the next day in a hot oven – about 190-200 deg C for about 15 mins – when they’re just as good.
You can even freeze them when completely cold, wrapped in grease-proof paper! To re-cook – just put the frozen pizzas straight onto the shelf in a hot oven at about 190-200 deg C, on the opened-out paper they were frozen in, for about 10-15 minutes but watch them carefully so they don’t burn.
Recipe Notes:
The ingredients I use are always organic wherever possible. Organic ingredients are scientifically proven to be more nutritious as they are higher in healthy omega-3 fats, higher in all phytonutrients as well as vitamin C, and naturally contain fewer chemical pesticides, heavy metals or other additives. This is how we have eaten as a family for over 40 years. Non-organic alternatives are easily available – but having been an organic farmer and grower all my life, I believe that real health begins in a healthy soil.