
After my recent blog post about making basic kefir, I decided to leave this article for a few weeks as I wanted to experiment to see just how long the kefir curd cheese would keep given the chance! So far the record with absolutely no problems is 6 weeks and counting – just as long as it’s not contaminated by taking any from it using dirty utensils – with perhaps traces of other foods on etc. If you see any coloured mould at all – pink or blue – then I would ditch it just in case – but in normal circumstances it should be fine. It is usual for it to turn a slightly darker creamy colour over time. It may also leak a little more whey out as it sits in the container but this is no harm – it just makes the curd even thicker. If you’re still unsure or unhappy about using it raw, even if there’s absolutely no signs of any mould – then simply cook it! Use it as you would use any other soft cream cheese or goat’s cheese. Don’t waste it! It obviously won’t be probiotic any more, as the bacteria won’t survive the high cooking temperature – but it will still retain all it’s other healthy nutrients. I must say it doesn’t usually last long enough in this house to worry about it’s keeping qualities!
Kefir curd cheese is endlessly versatile and useful in all kinds of recipes – such as pates, dips and spreads to serve with vegetable crudites, dehydrated veggie crisps or on toast. Serve it plain on crackers – topped with cold meat or fruit for a quick lunch, in a bowl, sprinkled with your favourite chopped herbs, dried Nori seaweed, chopped nuts, etc. or with spice mixes such as Rose Harissa, or drizzled with pesto. In wraps with salads. These are all quick and easy, look great and are delicious. Or you can incorporate any sort of herbs, chili flakes, salt or other flavouring into it, by simply mashing them in with a fork. Lots of people make cheese balls with added herbs to store in olive oil in the fridge for quick snacks. A dollop of it makes a simple, delicious and healthy pud, smothered with a berry coulis – or even a specially healthy, yummy version of the French dessert ‘Coeur a la Creme’, if you happen to own one of those fancy heart shaped moulds! We love it as a damson puree topped cheesecake, with a low-carb coconut, almond, chia and cinnamon base. The tangy, almost citrussy notes of kefir seem to complement all fruits. There are one or two serving examples pictured below. One of the very best things about kefir and kefir curd making is that you really don’t have to be precise about measuring anything – great for busy people! It’s also terrific to experiment with – I’ve never yet made anything inedible! (the only time I ever measure anything is when I’m baking – because even a small variation in amounts can be disastrous!) – So basically – the only limit to what you can do with kefir curd cheese is your imagination!
My recipe for ‘Twice-Baked, Two Cheese Souffles’ (using some kefir curd cheese) is here: https://nickykylegardening.com/twice-baked-two-cheese-souffles-with-a-parmesan-glaze-seasonal-salads-from-tunnel-to-table-recipe-for-spring/
It can also be used raw in my ‘Easiest Smoked Salmon Pate Ever’ recipe: https://nickykylegardening.com/from-tunnel-to-table-christmas-new-year-recipe/
 |
 |
| Smoked salmon & mushroom tortilla with kefir curd cheese | Smoked salmon & mushroom tortilla with Kefir curd cheese served with homegrown salads |
 |
 |
| Twice-baked 2 cheese souffles with kefir curd cheese – served with a seasonal salad & semi-dehydrated Rosada tomatoes | Smoked Salmon Pate & Watercress wrap layered cake |

You will already have most of the equipment from my ‘How to make basic milk kefir’ blog post here: https://nickykylegardening.com/how-to-make-basic-milk-kefir/
The only extras you will need are either butter muslin (plenty as you will need about 18 inches square double or treble thickness because the weave can be a bit too large) – or a cotton nut milk bag which can be purchased online – or a couple of baby muslin squares which are also available online. The nut milk bag and muslin squares are also available made from organic unbleached cotton and I prefer these.
(Some people recommend using coffee filters but I like to be able to recycle things rather than using them once and throwing it away. I use the baby muslin squares doubled over as they hold quite a large amount compared to nut milk bags, are easily washed, don’t fall apart and so can be re-used ad infinitum. Just wash them in hot water using a normal environmentally-friendly washing up liquid that won’t leave any residues. This gets rid of any solids or fats clinging to them. Then rinse well and scald afterwards with boiling water in a bowl. Leave to cool, wring out and dry. Store the dry muslin in a bag to prevent it from becoming contaminated by anything in kitchen cupboards or drawers.)
Some string, a hook (preferably plastic) to hang it up with and large glass or ceramic bowl to drain the whey into. Away you go – you’re ready for your cheese-making adventure!
This applies however much kefir you have – measuring amounts isn’t critical. The instructions are exactly the same whether you decide to have a go at triple fermentation like me – or just start off with only a small amount of 1 or 2 day-fermented kefir. One thing I must say here, is that there is no point trying to do this with commercially made kefir – as it’s much thinner and contains a far more limited range of bacteria. I would be and expensive waste of time. Home made milk kefir is what you need for this!
1. Before straining the fermented kefir off the grains, stir everything around gently in the jar. This helps to loosen the curds which are clinging to the kefir grains, re-combining the curds and whey, so that it all looks a bit more homogenised and will pass more smoothly through the sieve. Then strain it as usual, using a flexible silicone spatula which is very useful for the bit of gentle persuasion which is usually necessary for straining the thicker culture. If it’s not stirred before doing this, I find it’s much more difficult to separate the grains from the thickened and separated kefir curds sticking to them, so you will lose out on some of the thickening curds.
(It’s quite normal for kefir to separate into curds and whey after fermenting for a few hours. Many first time kefir makers panic when they see this – thinking that they’ve done something wrong and it’s ‘gone-off’! They haven’t! It’s a good sign and means that your culture is active and working vigorously. If nothing happens – then that’s the time to be worried, as it may have become contaminated with something. If you always use organic, full-fat milk and don’t use nasty dish-washing detergents – then your kefir grains should stay really healthy and this shouldn’t happen).
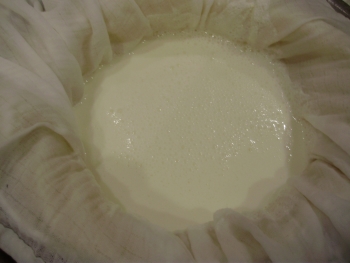
2. Sit the sieve on top of the bowl. Place the muslin or nut bag in the sieve, then pour the resulting kefir liquid very slowly and gently into it. (If you do this too quickly from a height then it may just go straight through, if it’s not a very thick culture yet! It’s a bit like pouring cream onto the top of an Irish coffee – if you’ve ever done that! Pouring it gently also keeps the resulting whey as clear as possible. This is valuable later for fermenting vegetables, baking or bread making).
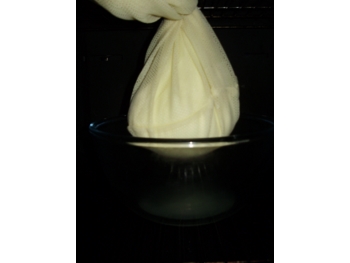
3. Gather up the sides of the muslin, tie together with string and if possible, hang it from the hook so that it still just sits in the sieve for the first few hours draining.This firstly stops disaster with the bag going splat back into the whey in the bowl and getting soaked again if the string becomes undone (it’s happened to me!) but also if you hang it above the sieve immediately it may drain too fast – again resulting in a more cloudy whey. When some has drained out it will be a bit lighter – then you can hang it up above and not touching the sieve to finish draining.
If you have enough room in your fridge, you could drain it in there. In hot weather this stops it over-fermenting, as don’t forget the bacteria are still alive and working. Any cool, insect-free place would do though. I have an electric oven in my cool, north-facing larder which is only used for baking occasionally, and it’s ideal for draining, as I can vary the shelf height. I like mine firm so I generally leave it draining for about 48 hours which gives a nice firm, smooth cheese. The longer it is left draining, the firmer and more tart it becomes.
You can also sit it back in the sieve at this stage and put a weight such as a plate with a can of something on top, gradually increasing the weight to achieve the desired consistency, if you want a very firm cheese to grate for topping pizzas etc. (heavenly – but obviously not probiotic unless it’s raw pizza! Caramelised red onion pizza topped with anchovies and kefir curd cheese is to die for!)
4. When it’s reached the firmness you want, just untie and unwrap it, scraping off any cheese that may still be clinging to the muslin or cloth. Turn it out into a covered glass or ceramic container in the fridge and enjoy! It will keep for several weeks if necessary, as I’ve already mentioned.(If there’s a little space around it in the container, it will drain off a bit more whey as it sits in the fridge – this can be added to the whey.)
Don’t waste the whey! The whey is the cloudy yellowish liquid that has drained from the Kefir curd into the bowl. Like the Kefir it has drained from – it’s also full of probiotic growth factors that stimulate the growth of beneficial organisms in the gut. It’s also full of lots of valuable nutrients – B-complex vitamins B3, B5, B6, B12 and folic acid; also minerals calcium, magnesium and zinc, potassium and sodium electrolytes. So it’s very valuable stuff! If you pour it into a clean glass jar with a tight-fitting lid, it can be stored in the fridge for several weeks and used in all sorts of different recipes. It can be used as a starter culture for fermenting vegetables and fruits, in salad dressings, mayonnaise, smoothies, sauces, soups etc. to make them healthier and more probiotic-rich. It can also be used in baking or bread-making where I find it gives an extra lift to the rise! It can be frozen for about 3 months but it will gradually deteriorate if frozen for too much longer than that – as the organisms contained in it will start to die off the longer you keep it frozen.
 |  |
| 1. Thick Kefir poured into double layers of muslin to strain for making curd cheese | 2. Kefir curd cheese hanging up with whey straining into a bowl |
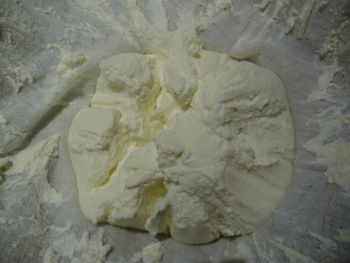 | 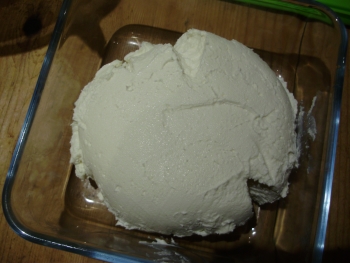 |
| 3. Unwrap the kefir cheese & scrape down any that is clinging to the muslin | 4. Turn the kefir cheese out into covered glass dish and store in the fridge. |
The smell of kefir cheese brings back so many memories whenever I make it. I love making my own soft cheese and being reminded of my childhood and making yogurt cream cheese from our own delicious goat’s milk. We had an old-fashioned, north-facing cold larder which was home to all manner of fascinating foods – many of which are just being re-discovered now. There was a meat safe made of fine mesh zinc, which backed onto the north facing window, looking a bit like an air conditioning unit. That was the perfect place to keep cold meats or cheese as it was essentially a cool, insect-free cupboard with excellent air circulation. It kept all sorts of things cool without the necessity of a fridge. On the ceiling-high shelves there were rows and rows of jewel-coloured preserves, Kilner jars of salted and pickled vegetables and mysterious looking, faded old biscuit tins that were always just out of reach. Underneath those shelves was a large marble shelf – or counter as it would be called now. It always seemed icy cold even on the hottest of days. On it used to sit large covered bowls of milk for separating cream and all sorts of other goodies under covers that were sometimes just within reach of small fingers for steal the odd bit! No wonder I grew up loving good food! It was like a food fairyland and it was a lovely place to hide and while away some time on a hot day!
My mother took the marble slab with her for sentimental reasons when she left the house where I spent most of my childhood. It was redundant, as that part of the house had already been demolished to make way for a ghastly, huge, modern kitchen that looked just like an antiseptic, white and chrome operating theatre – which never felt like home. The Aga and dog beds were banished forever! Perhaps she regretted the changes? I’ll never know. Anyway – when she eventually came to live here with us in Ireland, already suffering from mild dementia, she brought that marble shelf here. Then rather sadly, she decided to have it cut up to make a marble hearth in her cottage here – despite my heartfelt protestations! Perhaps she just wanted it close to her to remind her of happier times? Anyway – most of it is now fixed to the floor in her old cottage – but I still have the small portion of it that was left over. I now use it in my own cold larder. Marble is an absorbent stone, and so at this stage it’s dulled, stained and scratched from centuries of use – but I wouldn’t change it! I stroke it’s cooling, smooth surface often………To me – it’s probably absorbed the DNA of all the people who used that larder and who I remember whilst growing up. It’s a sentimental treasure – which I value hugely – being a sentimental soul.
(Please note.I really enjoy sharing my original ideas and 40 years experience of growing and cooking my own organic food with you. It’s most satisfying and naturally also very complimentary if others find “inspiration” in my work……But if you do happen to copy any of my material, or repeat it in any way online – I would appreciate it very much if you would please mention that it originally came from me. It’s the result of many years of hard work and hard won-experience. Thank you.)