From Tunnel to Table recipe for Spring
 |
 |
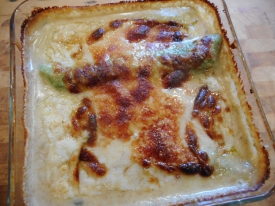
| Cooked cannelloni just out of the oven and nicely browned | Carb-free Cannelloni, with spinach, bacon and chestnut mushroom filling, in cheese sauce. |
This is a very healthy LCHF (or low-carb, high healthy fat recipe) – which I call “I can’t believe it’s not pasta!” – because it has all the satisfying and comforting feeling of pasta, but without any of the carbs – and you’d never know it!! It’s very nutrient-dense, full of protein, calcium and lots of other important nutrients. And even more importantly – it’s extremely low in carbohydrates.
As Dr Verner Wheelock said in his recent interview with my Tunnel to Table co-host Gerry Kelly (link here: http://nickykylegardening.com/
Wholegrain carbohydrates also feed your vitally important beneficial gut bacteria, helping to keep them healthy and doing their job. If we occasionally eat any carbs from grains here – they’re always wholegrain. Once you get used to eating them you’ll find that they’re not just more nutritious – but also have a lot more flavour. I find anything made with refined carbs like white flour completely tasteless!
I make the cannelloni using the easy low-carb wraps which I invented a few years ago and which I’ve used before for some of my other recipes.
This isn’t a fast recipe to make if you do it all in one go – it will probably take about an hour or so to prepare each bit and put it all together. It’s not difficult – but it just takes time to do each stage. Then naturally you have to add the cooking time of about half an hour.
It’s well worth the time taken though – as it’s really delicious comfort food which you would never guess is super-low in carbohydrates!
All of the stages can be made ahead, refrigerated and assembled 2-3 days later before cooking.
If you have the wraps already made – you can also fill them with anything else you like – leftover roast veg, chopped leftover ham etc. Anything goes – and it all taste great with a cheese sauce nicely brown on top!…. Doesn’t anything?
I used a mixture of spinach and watercress for the cannelloni wraps but they can be made using spinach or you can just make plain ones if you like.
I also used a mixture of perpetual spinach and chard from the polytunnel for making the filling, as they are my reliable standby veg which I always have at this time of year. This recipe works works with bagged organic baby leaf spinach from the supermarket too, if you don’t have any homegrown spinach or chard. It’s obviously not as cheap to make though if you’re buying spinach. It also works well with baby leaf kale, broccoli or in fact anything else you like!
As usual – all the ingredients I use are organic – but that’s up to you.
Carb-free Cannelloni
Serves 2 for supper with no side dish, or 4 for lunch, or 4 for supper with a side dish of extra veg – sliced carrots go nicely with this. It’s also nice with some chopped or halved hard boiled eggs included in the filling – if you want to ramp up the protein a bit.
First make the wraps as outlined below – these will sit on a covered plate in the fridge quite happily for a few days if you want to make them ahead.
Low carb cannelloni wraps
Each wrap makes one cannelloni
Ingredients for 4 spinach and/or watercress wraps:
4 med/large organic eggs
1 tablespoon organic flax flour.
40g of watercress or baby spinach leaves or a mix of both! Washed and spun dry in salad spinner.
(If using flax flour it’s better to grind your own fresh – the Nutribullet/Nutrimix-type blenders have a spice grinding attachment which will grind small amounts brilliantly and it’s better to grind it fresh if you can. Keep any unused flour in the fridge afterwards so that its stays fresh. Nuts and seeds should always be kept in fridge to prevent fats ‘going rancid’ or oxidising. If nuts are kept in a warm shop shelf this can happen quite quickly – you’ll get a horrible ‘chip pan’ smell off them! Fresh nuts should have a pleasant, sweet smell.) If using coconut flour – until the 18th of October – Holland & Barrett health stores have coconut flour at half price which is terrific value!)
A few grinds of fresh organic black pepper. (Salt is unnecessary in this recipe if using bacon as that may be salty – but if you’re not adding bacon to the following cannelloni filling then add as you wish)
Organic virgin coconut oil for greasing the pan.
(Coconut oil is best for this as it prevents possible sticking which can still happen even with a non-stick pan if not hot enough. A mix of coconut oil & butter is nice too but may stick more easily and butter can also burn more quickly than coconut oil at high temperatures. Coconut oil is widely available now – organic is best as the quality is assured but prices can vary widely between shops so shop around. Coconut oil is the very best fat for frying at a high temperature as it is stable and withstands the heat of cooking better, without altering chemically, which can happen with other cooking oils. It is the healthiest source of saturated fat – which up to date research proves is actually good for us. It’s good for our heart, brain, skin, gut and immune system. Although called an oil – it is actually solid at room temperature but melts easily. As it contains antioxidants such as Lauric acid – it doesn’t go off and is stable at room temperature for a long time, so you don’t need to keep it in the fridge. It’s also delicious – I often eat a teaspoon on it’s own! Being very slightly sweet it reminds me of the coconut ice my grandmother used to make – but without all the sugar!)
Method:
This just couldn’t be easier – if you’ve made my low-carb wraps previously then the method is identical. The filling ingredients differ slightly that’s all!
1. Grind the flax seeds into a flour if using, add the flour to the eggs in the blender or bowl, (make sure to add in the eggs first before adding the flour or it sticks to the top of the blender when inversed to blend!) add a small pinch of pepper & blend – a Nutriblender or Nutrimix is ideal as they blend evenly – but a whisk is fine too.
2. Chop the watercress/spinach fairly finely and add to the mix then blend.
3. Heat pan with a small knob of coconut oil – about hazelnut sized. When it’s really hot add a 1/4 cup measure of the mixture and tip the pan from side to side to distribute around the pan evenly. Do this as quickly as possible or you may end up with a wrap with gaps as it can ‘set’ very fast! It’s exactly like making a thin pancake. It’s essential to get the pan really hot for the first one or it may stick – after the first they tend not to stick so much. (Seasoning the pan first by heating it to a high eat with some oil in can help prevent sticking – after heating up then wipe out with kitchen towel and proceed with the recipe, adding more oil to cook the first pancake) Be careful not to get the pan too hot or the mixture may bubble up and possibly break giving you holes in your wrap! If in doubt remove pan from heat for a moment while you turn it down to medium/hot and replace pan on heat.
4. When the top sets, no longer looks ‘wet’ and the sides of the wrap start to slightly come away from the pan – use a greased, wide spatula and turn it over carefully. (The first one can be delicate at this stage so greasing the spatula helps the wrap to come off the pan more easily without catching on it and tearing).
5. Stack the wraps onto a plate as you make them and cover. The steam as they cool helps to keep them pliable. Made with coconut oil they won’t stick so don’t worry.
6. Chill these until needed – they can now be kept for 3-4 days in the fridge – so they’re easy to make ahead and chill. (I often make a few of these or the plain wraps without added spinach every week just to keep on hand for ‘snacky’ moments when I might otherwise reach for the bread – as they’re far more nutritious, high in satiating protein and free of carbs!)
 |
 |
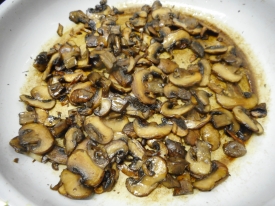 |
| 1a. First make the cannelloni wraps | 1b. Fry the bacon until brown and crispy, remove & chop | 2. Fry the mushrooms in the same pan until nicely browned |
 |
 |
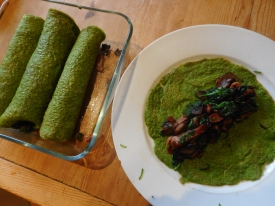 |
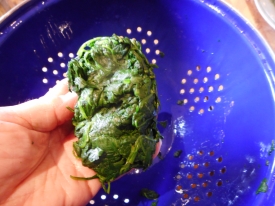
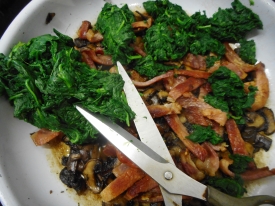
| 3 & 4. Squeeze as much moisture as possible from the wilted spinach | 5. Chop spinach into other ingredients and mix well | 6. Place a quarter of the filling into each wrap, roll up & place into ovenproof dish |
 |
 |
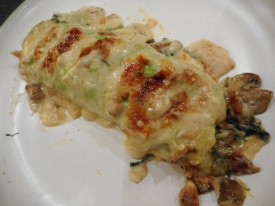 |
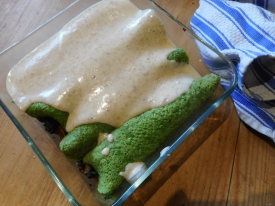
| 7. Completely cover with cheese sauce. Add grated cheese to top if wished | 8. Cooked cannelloni just out of the oven and nicely browned | Carb-free Cannelloni, with spinach, bacon and chestnut mushroom filling, in cheese sauce. |
Spinach, bacon & chestnut mushroom filling
Utensils:
You will need a square, rectangular or oval ovenproof dish roughly the same length as the rolled up wraps or slightly larger.
Ingredients for filling:
A packet of smoked (or plain) bacon rashers – I used 4 rashers of M&S organic smoked bacon which has a great flavour. (There’s 6 in pack – so if you cook them all you can keep 2 for crumbling over salads etc or for a sandwich! We find the flavour a bit too strong if using all 6 rashers in this recipe and it also makes it a bit salty – but it’s up to you) You can also get organic bacon from Coolanowle organic farms who can be found at various farmer’s markets around County Dublin and they also do mail order – www.organicmeats.ie
400g of spinach – I used a mix of my perpetual spinach and chard leaves (strip the leaves off the tough stems and keep the stems for another recipe). Alternatively, 2 packets of baby leaf spinach would do
One 200g pack of organic chestnut mushrooms – sliced (you can use white button mushrooms if you can’t get chestnut ones – but again they’re not quite as tasty or nutritious)
Filling method:
1. After making the cannelloni, fry the bacon in a little coconut oil until it’s nicely browned and crispy, without burning. Chop into pieces, set aside and cover.
2. Fry the sliced mushrooms in fat remaining in the pan – adding a little more coconut oil or butter if necessary to prevent them sticking. (They’ll pick up all the flavours from the pan.) Covering for first 10 mins starts the mushrooms releasing their water. After the mushrooms start to look less ‘raw’ – then take off the lid, reduce the liquid and fry at a higher temperature, stirring them occasionally until they’re nicely browned.
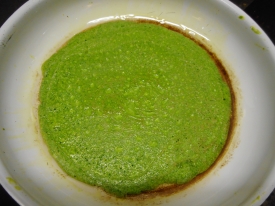
3. Next (or while cooking the mushrooms) add the spinach to a large pan of fast boiling water. Stir around until just wilted & drain immediately in colander – running cold water over it to cool it and stop it cooking. Squeeze out all of the moisture possible with your hands or wring it out using clean tea towel.
4. When you have squeezed as much moisture as possible (to prevent the finished dish being too watery) – chop it finely. Picking it up in you hands and chopping with kitchen scissors is much easier and quicker than chopping it on a plate.
5. Mix all the filling ingredients together.
6. Place a 1/4 of filling in a line down the centre of one of the wraps and roll the wrap up around it. Place the rolled-up cannelloni in your dish with the join underneath. Repeat with the other wraps.
7. Cover them completely with the cheese sauce when made, and sprinkle over some freshly grated Parmesan cheese if wished.
8. Cook at 180-200degC depending on heat of your oven – until browned nicely on top. Leaving it to sit for 5 minutes or so to settle after cooking and before serving makes it easier to serve.
Serve using a flat spatula and large spoon to support the cannelloni so that they don’t fall apart, and then spoon over some more of the sauce.
Cheese sauce:
Ingredients:
80g butter
80g wholemeal flour
500ml of full-fat milk
115-170g Mature Cheddar cheese to taste (we use 170g – but we like things very cheesy!)
Method:
1. Put butter, flour and milk into a non-stick saucepan and whisk constantly as it warms up and begins to to boil – then reduce heat and simmer for a couple of minutes, stirring while it thickens.
2. Add in the grated Cheddar cheese – stir until melted and them pour the sauce over the prepared cannelloni in the dish.
3. Top with some grated Parmesan if wished
You won’t believe it’s not pasta! – Enjoy!