Roasted Winter Root Vegetables with Garlic, in Rosemary Oil – From Tunnel to Table!
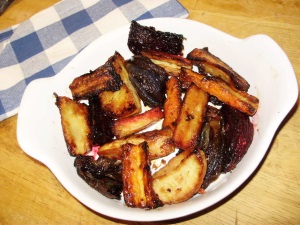
Roasted winter root vegetables with herb oil – ready to serve.
My first ‘Tunnel to Table’ recipe is a great favourite with all my family and with visitors too. We eat it a lot here because it’s so easy, delicious, ‘more-ish’ and goes with just about everything. Some of you may cook variations of this already – but I think it’s worth re-visiting if you haven’t done it for a while. I find it really useful for so much more than just serving as a side dish to go with meat. It’s always handy to have some of this in the fridge for all kinds of meals in an instant! And if you’re vegetarian, there are endless permutations you can make for meat-free alternatives.
It’s dead easy – if you can use a peeler and a knife safely, you can do it! You throw everything into one pan so you’re not watching different pots at once – you just need a couple of sheet pans or flat baking trays. (A really sharp veg knife is important – you’re far more likely to cut yourself with a blunt one because you have to use more force)
You can get all the ingredients anywhere if you don’t grow your own. They don’t have to be organic – that’s up to you, but the latest research from Newcastle University shows that organic veg are far higher (approximately 60%) in antioxidants and other important nutrients – equivalent to eating 2-3 extra portions a day – so if you’re not a great veg fan – you can eat less veg and still get your recommended 7 a day! And of course organic veg aren’t treated with any chemicals like pesticides, weedkillers and anti-sprouting agents.
All the veg are seasonal and relatively cheap – So you’re not using imported or expensive out of season ingredients that have a big carbon footprint.
The vegetables are also at their nutritious best – full of summer’s stored goodness!
It’s very flexible – you can use pretty much anything that’s in season to vary it, leave something out if you really hate it, and make as much as you want at a time.
It’s healthy – the rainbow of colours in the veg supply a huge range of different phytonutrients – and the oil in the recipe helps your body to absorb and metabolise those nutrients like beta-carotene.
It actually saves energy – although it needs quite a high cooking temperature 220/230deg C beause this seals in all the juices and the nutrients – you can cook enough for 3 or 4 meals together at the same time, so you could be using only a quarter of the energy you normally would in cooking several meals.
It can save you time in adavance – because you can prepare all the veg the night before, or even at the weekend if you want, so that if you’re in a hurry after work, all you need to do is to toss it in the oil and throw it into the oven when you want it. It does take a bit of time doing the peeling and chopping – but it’s not exactly hard work – you can do it easily sitting down. You can even get the kids to help to prepare a batch if they can use a peeler – mine used to love doing this. It helps to encourage them to eat more veg., and is a nice relaxed way to get the family around the kitchen table for some chat and communal veg preparation.
You can even add a couple of evenly sized chicken breasts, or a couple of salmon steaks parceled up in greaseproof paper about 20 mins before the end – and Hey Presto – you have complete, delicious meal all in one pan with no hassle!
This is one of my really useful ‘convertible’ recipes, that can be used in masses of different ways once it’s cooked. You can make a vegetarian lasagne with it, throw some of it into a frittata (an Italian omelette), put it cold in a ‘wrap’ with some mayo and salad, use it in a toasted panini with some cheese, on top of a pizza, reheat it gently to serve another day, even use it cold in salads, or whizz it up with some stock and you’ve got an instant veg soup!
That’s if you’ve any left because it’s incredibly delicious straight from the fridge. On it’s own or with mayo – it’s very difficult to resist!
(Thanks to Gerry being unavoidably delayed when we were to record the radio feature the other day – we discovered another new form of deliciousness! I had a hot oven waiting so that he could taste it hot, because it had already cooled, having planned it to be ready an hour earlier. So we then discovered that ‘Twice Roasted Veggies’ are even more scrumptious and toffee-ish! No one would ever believe that humble vegetables could taste so wickedly decadent! I have to confess that we sat round the kitchen table and scoffed the lot after we’d finished recording and Gerry had gone! Funny thing – often some of my best recipes, and also garden tricks, have been discovered quite by accident. Nothing is ever wasted in this house – even the mistakes! So you could even roast a whole load of it at the weekend – throw it into a really hot oven for five minutes when you want it – and there you are!
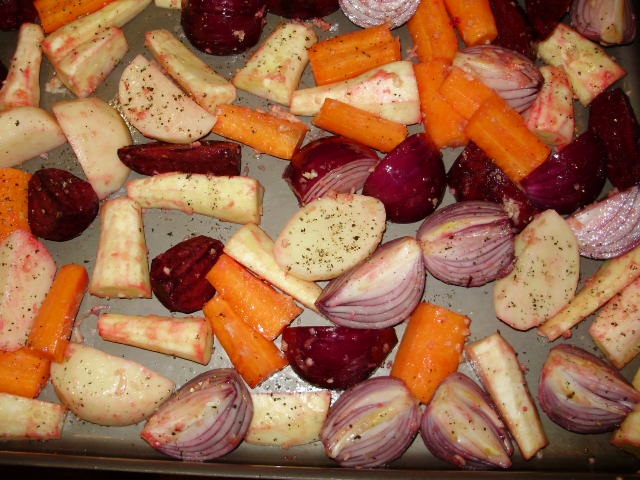
Veg all prepared, tossed in oil and seasoned with salt & pepper – ready for roasting
Ingredients:
I’m not going to list them all down in a long column because it’s whatever you feel like – in whatever quantities you like! Nothing is written in stone – it’s very flexible. One large sheet pan will do about 6 – 8 portions depending on how greedy you are!
For one large sheet pan/baking tray you will need 2 medium to large carrots, 2 med/large parsnips, 3-4 medium onions, 2 beetroot, 2 medium/large potatoes. I use 6 cloves of garlic to one sheet pan – but I love garlic! Two large sheet pans is the most I would roast together as otherwise they create a lot of steam and the veg won’t roast properly. It’s the toffee-ish, caramelised edges that make it delicious! I usually cut the beetroot into slightly smaller wedges as it takes a little longer to cook than the other veg. If you think you hate beetroot because you have memories of horribly vinegary pickled beetroot – try this and you’ll be converted! I often use celeriac if I have any, and you can also use any other veg like Jerusalem artichokes or sweet potatoes – but they’re a bit softer and will cook quicker, so don’t throw them in until about halfway through the cooking time.
The herb oil I use is made with rapeseed oil. You could just use plain rapeseed oil – adding a sprinkle of chopped rosemary, or thyme if you haven’t got any, to the veg mix. Rapeseed can be heated to a much higher temperature than olive or sunflower oil without burning as it has a higher smoke point, so it’s best for this sort of high temperature cooking. Burned cooking oils produce toxic acrylamides, which can cause cancer.
Lots of freshly ground black pepper and a good sprinkling of sea salt. If you’ve never tried organic black pepper – do – it’s a revelation! Far more aromatic and richly scented than the other stuff – again because the aromatic terpenes that give it it’s flavour and scent are much higher in really fresh, organically grown peppercorns. Never use ready-ground black pepper – you may as well use sawdust!.
Method:
You just peel and chop all the veg to roughly the same size, apart from the beetroot which needs to be a wee bit smaller. It doesn’t matter what size everything is as long as it’s all roughly the same. Leave the root end on the onions – just cut off the top or stalk end, cut in half, then peel back the skin like the petals of a flower, taking off the dirty end bit but leaving the inner layers still joined together at the base. Cut those halves into quarters again through the root if necessary, depending on the size of the onion. Crush the garlic and mix it well through everything.
You can prepare all the veg ahead to this stage and put the mix into a well sealed bag somewhere cool, like the salad drawer of the fridge.
Then, when you’re ready to cook, put all the veg into a large bowl and drizzle all the veg nicely with oil, (not too little or it will stick – not too much or it will be swimming!) When you’ve evenly mixed or massaged the oil through the veg and they’re well coated – there shouldn’t be a pool of oil at the bottom of the bowl. Add a little more if you think it’s too dry and not quite coated enough, or it will stick when cooking. Mix the oil through well with a couple of spatulas or large spoons – or I use my hands, they’re really your best tools!
Have the pan(s) heating up in the oven at about 220/230degC. All ovens vary – yours may be different to mine – so you’ll have to play it by ear a little. Then when they’re sizzling hot take out the pan(s) – divide the veg between them in a nice even single layer, crowded together, side by side is ok but not on top of each other. Cook for about an hour, turning half way through, until they’re nicely caramelised at the edges. The high temperature seals in all the nutrients. Let the steam out for a second once or twice in first 1/2 hour – just open the oven door slightly, being careful to avoid the steam whooshing out or you’ll be scalded – and then close it again immediately. If you don’t do this they’ll just steam and look horrible, rather than browning nicely with all that caramelly ‘Umami’ stuff on the outside! Just when you think you’ve gone too far and they’re about to burn – that’s when they’re perfect! Don’t worry if the points of the onion quarters start to look a bit burnt halfway through, they’ll be fine again after they’ve been turned.
Take the trays out and turn all the veg halfway through – this is the only fiddly bit – but it’s worth doing properly so that they evenly brown. When you’ve turned them, put them back in at the same temperature. Then about 20 mins before the end you can turn the oven down to 200deg.C, push the veg aside a bit and throw a couple of oiled chicken breasts into one corner, a few streaky rashers if you eat bacon, or maybe some fish steaks with a spritz of lemon, done up in a greaseproof paper parcel to seal in juices. Then – hey presto – you have a whole nutritious, easy meal or two – all in one pan!
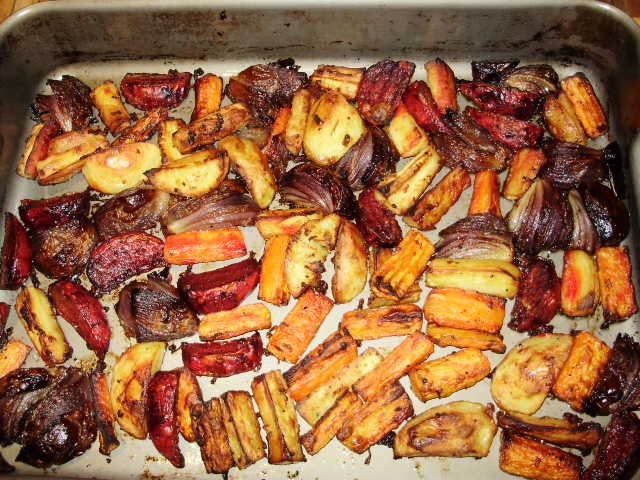
After an hour’s roasting in a hot oven – caramelised, sweet, savoury & delicious.