Contents: A Growbag Gardening – a Flexible Way to Grow… Tomato Memories and New Discoveries…. A gloriously abundant but hectic time in the polytunnel!…. Growing new potatoes for Christmas….. Barely controlled chaos!….. Aubergines, Peppers and Tomatoes….. How to get a second crop of Climbing French Beans from the Same Plants!… Time to think about winter now!….. Routine jobs……
Growbag Gardening – a Flexible Way to Grow
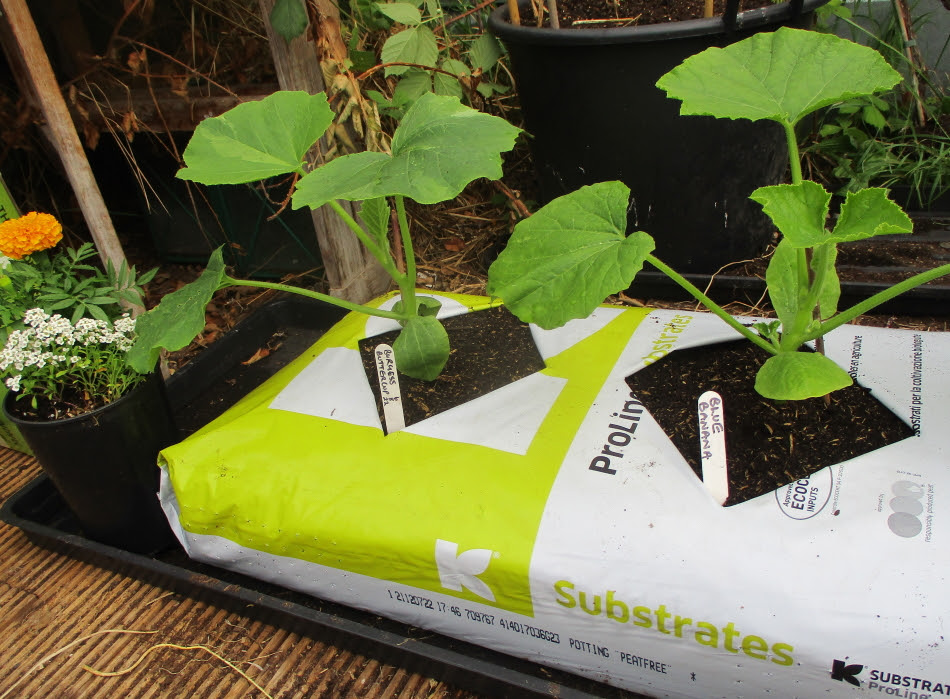
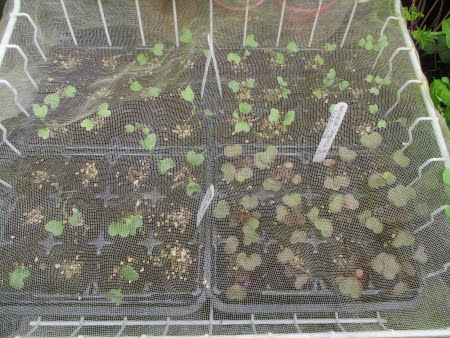
Squashes planted in late May in a homemade growbag of peat-free compost, sitting on a grow tray in the polytunnel – now growing well
Squashes planted in late May 2022 in a homemade growbag of peat-free compost, sitting on a grow tray in the polytunnel – now growing well
In May 2022 I realised that although I have written quite a lot about growing in different containers – growbags specifically were not something I had written about before. But as they come with their own unique challenges, so I decided that it was high time that I did! I’m clarifying my instructions for making them here – with an update on how they’ve done so far. Even if you already have plenty of growing space (and what keen gardener ever has enough?) they can provide really useful extra growing space in a small garden, or even if you have no garden at all – and they will very quickly pay for any outlay in terms of the amount of produce you can grow in them. They are perfect for growing undercover in a greenhouse or polytunnel, as being movable they can fit in anywhere. Particularly useful at this time of year when polytunnel space is at a premium being full of late summer crops, but we need to start off some of the winter ones. You can even put them on a trolley with wheels on and start crops outside at first, wheeling them undercover when the weather worsens in autumn and space for them is cleared as summer crops are gradually finished..
Just saving the cost of four or five bags of spinach, Gem lettuce or mixed salads from your average local supermarket at around €3 each would quickly pay for the cost of just one bag of organic, peat free compost. But here I must stress it should be good quality! The average cheap peat-free from the DiY multiples will simply not do the same job! Recently someone on social media said they had tried making a growbag from a bag of peat-free compost, and it didn’t work as the plants were stunted and unhealthy! I asked them if it was an organic peat-free compost, and they said no, that it was one from a DIY chain. Most of these composts are made from rubbish ingredients and contain chemical fertilisers, for the sake of cheapness. However, if you buy a good quality organic, peat-free compost, the amount of healthy crops you will be able to grow in them will be worth far more than the initial outlay. I can never understand why some people try to save money by buying rubbish compost – whether peat-free or not. Using composts containing Fertilisers or peat may seem cheaper in the sort-term – but the long-term they are literally costing us all the planet!
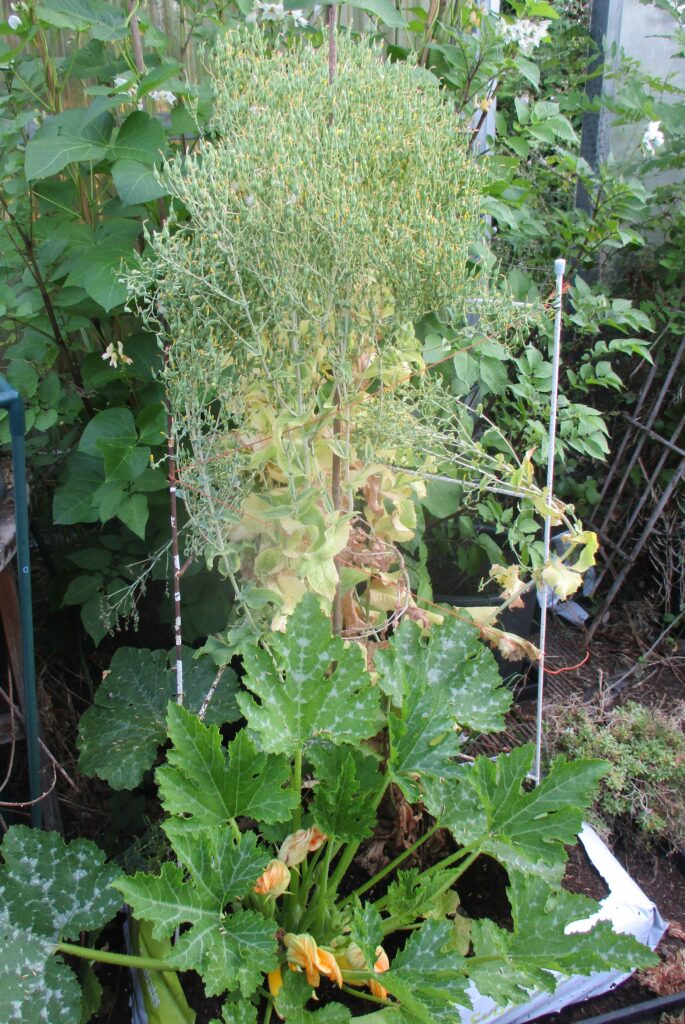
Two years ago at farmer’s markets they were charging €15 for large Crown Prince winter squashes in our local farmers market, selling them by weight, and grew four last summer from just one growbag. The growbags can also be recycled and re-used endlessly by refreshing the nutrients in them after they’ve grown a few crops! So far the bags pictured above are on their third crop, having grown lettuce and mustards over winter 22/23, and the Atena courgettes currently producing well in them will come out in about another four weeks to make way for more winter greens or lettuce. I also produced a crop of lettuce Jack Ice seed, by leaving the best plant in one of the bags to grow on to flower, and make enough seed for years – as you can see in the picture below. So that’s a big saving on seed too! Not bad for an initial outlay of €15, a bit of worm compost made from kitchen waste and a few seeds! OK – growing in the ground may be even cheaper – but it still needs feeding with compost, and it’s not nearly as flexible or convenient – especially for people like me who may have physical challenges of one kind or another to overcome..
I have mentioned before that many years ago, before we moved here, I grew all our vegetables and fruit in containers and homemade growbags for two years. It was impossible to buy organic produce back then, except from a handful of small-scale commercial organic producers – and most of those were situated a very long way away. So if you wanted to eat truly ‘clean’, pesticide-free food for your family – which I did – you had to grow it! Having only a tiny back yard, in a rented house where we couldn’t dig up the only small patch of soil which there was – there was no choice but to use growbags and containers. This was also essential as in the second year there when we had to be ready move at any moment – and bringing our crops too! The big problem back then was that the only growbags available were filled with peat-based composts, containing artificial fertilisers, and not what I wanted to grow vegetables in to feed my severely allergic child!
Luckily now there are at least a few choices of peat-free bagged composts – and although these not all are organic, it is very easy to turn those into growbags ourselves, with a little ingenuity. Most have a larger volume of compost in them than normal growbags, which is a good start. When buying growbags, there is in my opinion another absolute essential – and that is a growbag tray to fit underneath it, to catch any water and nutrients which will drain out of the bags, thereby stopping any water loss and preventing waste of nutrients and possible pollution. The trays I use for my home made growbags are just slightly bigger than most standard growbag trays, with a small lip around the sides, about 5cm or 1 & 1/2in. deep. Most large bags of peatfree compost will not fit onto normal growbag trays when lying flat, without hanging over the edge, as they are wider than normal growbags – so theses larger trays are essential. They are sold in various sizes for displaying plants in conservatories and garden rooms, and are ideal for the larger 75l bags of compost, which will fit on them easily with some room to spare. This allows for easy watering and feeding from beneath later on, rather than always watering at the top around the neck of the pant. The added advantage of being on a tray also means they can also be placed anywhere you have room for them, on a path or a balcony, so they don’t have to be outside, and can be placed anywhere with good enough light to grow plants.
Before you plant anything in them the first thing to do is decide where you’re going to put them obviously! Most leafy salad vegetables and greens like spinach will tolerate partial or total shade during the day, but if you want to grow great tomatoes, melons and aubergines, then they really need as much sun as you can give them. The next thing to do is to lay your bag of compost on the tray and give it a couple of good shakes to make sure that the compost is as evenly distributed as possible. When you’ve done that – then make either two or three crosses in the top, depending on what you want to grow. I cut the crosses with a sharp pruning knife, about 15-20cm either way. Two works for courgettes and squashes, which have a big root system, and three works for tomatoes and peppers. I never cut out whole pieces as this can make the bags much less useful for recycling later for other uses in the garden, which is always something I think of in advance of using anything. Remember – you can make them larger, but you can’t put anything back once you’ve cut it off! DON’T make drainage holes at this stage – as the compost should be fairly dry when first opened, and the water may just run straight out, taking some compost and nutrients with it, as I saw happening to someone recently on television!
Next, water the bag as evenly as possible without saturating it. Do this gradually, and after putting some water on, go back a few hours later to see how that’s been absorbed, and if you think it needs more, add a little more then. It can take fresh composts some time to absorb water at first. Leave it to settle and absorb that for 12-24 hours, and if you think it’s damp enough, only then cut or puncture 2-3 small drainage holes in either end, just below the end joins in the bags, which will allow for a small reservoir of water to settle at the very bottom before it overflows. In the larger growbag trays, as some plants grow bigger, you can make the drainage holes slightly bigger, and make more along the bottom later, and even mound a little fresh compost up against the ends of the bag, so that the roots can find their way out to forage a bit more and that will give the hungry plants a boost, giving your crops a longer season. You can pour liquid feed into the trays as well, rather than pouring it directly onto the plant stems, which can sometimes cause stem rotting – especially in crops like cucumbers and aubergines. Next place your plants into the bag, watering them in just a little to settle the roots in, but DON’T Saturate them. Again, you can always add more gradually, but if you get them too wet and the next few nights are unexpectedly cold, they may suffer.
If you need to support the plants later on, it is very easy to make a rectangular or triangular wooden frame which I did many years ago out of some wood which I found in a skip and recycled – and I’m no carpenter! These can be very useful covered with polythene later too – making a handy cold frame. I’ve also used old clothes horses or airers, and even ild metal wardrobe frames and metal stepladders temporarily, or you can buy metal concrete-reinforcing frames or panels in DIY stores. These are quite expensive although they will last forever. But never underestimate the usefulness of a bit of skip diving outside houses which are having a makeover – I’m rather shamelessly addicted to it! It’s amazing the useful stuff some which some people will thoughtlessly throw out to be consigned into landfill sites – it’s no wonder we have a planet polluted with stuff that some people consider rubbish!
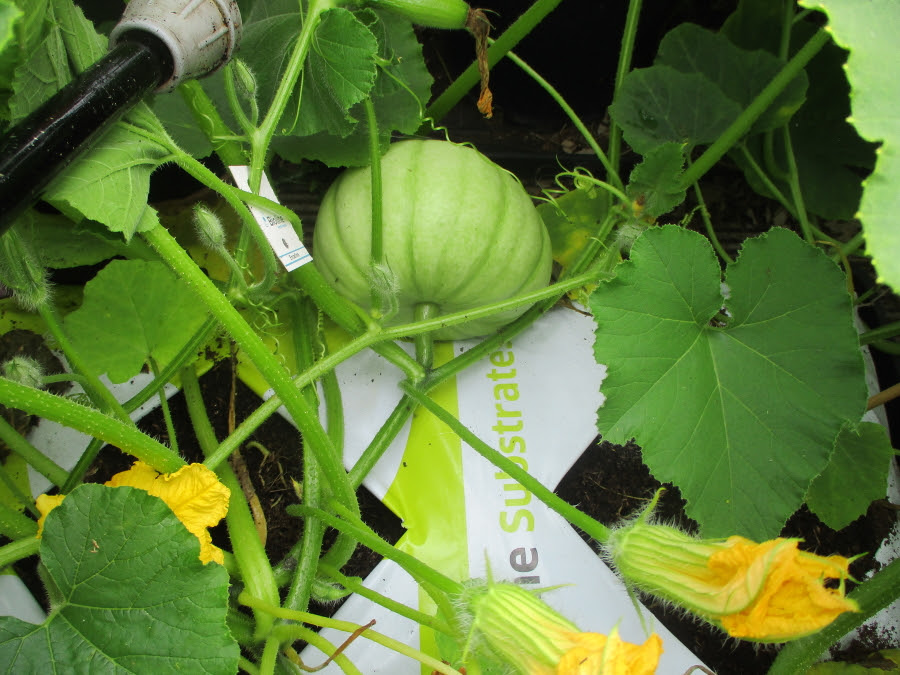
The winter squash plants I planted, two plants per bag, in late May 2022 did incredibly well. In fact they made a takeover bid for all of the space at the top end of the polytunnel, and it was quite difficult to walk around them! I planted four varieties, Blue Banana, Burgess Buttercup, Crown Prince and North Georgia Candy Roaster – all dense-fleshed great keepers. These were left in the bags until the end of September – until they had stopped growing, were really well-ripened, and their stems were ‘corky’ – looking. Then they were cut off their vines, with a ‘T’- shaped handle or stem, and left to ripen off for a little longer in the sun.That way they will keep for months, often until it is time to sow the next year’s crop. As I write in early August 2023, I still have one Crown Prince left from last summer’s crop, which I left just to see how long it would keep!
Squashes and pumpkins don’t die when they are harvested, and kept in a cool dry place – they will go on increasing in healthy carotenoid nutrients (precursors of vitamin A) for at least couple of months after picking. Really dense-fleshed squashes are delicious, nutritious and really useful for all sorts of dishes – bringing the distilled essence of summer sunshine to the darkest depths of winter. Even though they’re grown up now – my kids still look forward to my ‘Sunshine Soup’, which is always a staple here in winter. The recipe for that is in the recipe section here.
Tomato Memories and New Discoveries
Tomatoes must surely be one of the most universally-grown fruits in the world. Almost anyone who has a garden grows them, as they’re so redolent of summer and so useful in the kitchen. If not – then almost everyone certainly eats them! As I’ve mentioned before, a few years ago I invited Dr Matthew Jebb, the director of our National Botanic Gardens here in Ireland and a fellow tomato fancier to speak at one of the early Totally Terrific Tomato Festivals. He has spoken at every one since, and until recently hosted it at the Gardens. He produced this amazing statistic for one of his talks – that “the human race eats half it’s own weight in tomatoes each year”. At first incredible to imagine – but when you start to think about the mind-boggling amount of processed products which contain them – apart from those eaten fresh – then it’s not as fantastical as it at first seems.
My first encounter with tomatoes began almost before I could walk. The scent of them is one of my earliest memories. Every early spring, that first evocative whiff of tomato foliage when separating tiny seedlings, takes me instantly back to the old greenhouse in the Edwardian garden where I grew up, and the warm, comforting greenness of it. Enclosed by high, red brick walls which seemed bathed in perpetual warm sunlight, that garden only exists now in my memory, having long since disappeared under a housing estate in the late 1960’s, like so many lovely old gardens. I never did any gardening at home, although I enjoyed the garden and the food it produced. I was too involved in horses then. However when I got married and had children, I started to grow my own tomatoes for the very first time, and began to discover their seemingly endless diversity. They have fascinated me ever since. It isn’t just their shapes, colours, textures, flavours and uses which fascinate me – but also their individual histories. The heirloom varieties especially, as because someone else found them delicious, useful or particularly tasty, they have been handed down, often through families and friends for centuries since humans first grew them.
While on the subject of heirlooms – I really wish people would stop calling ALL unusually-coloured or odd-shaped tomato varieties “heirlooms”! They are only heirlooms if they are rare old varieties, the diversity of which has been preserved from the past. While it may be a catchy selling point for tomato producers and supermarkets to use – it’s not only very confusing and untrue, but also incorrect. Especially since most of them are tasteless, modern F1 hybrids!
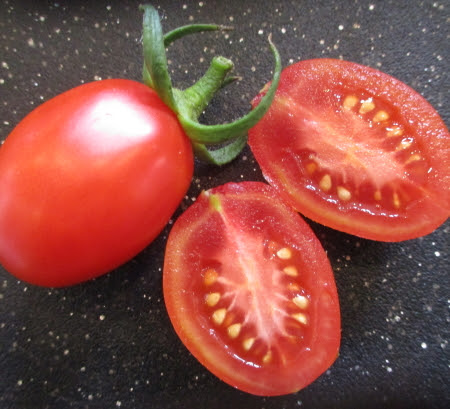
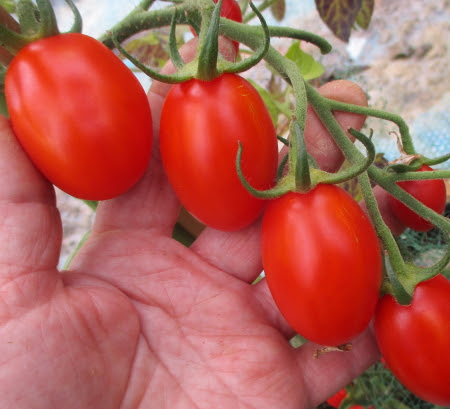
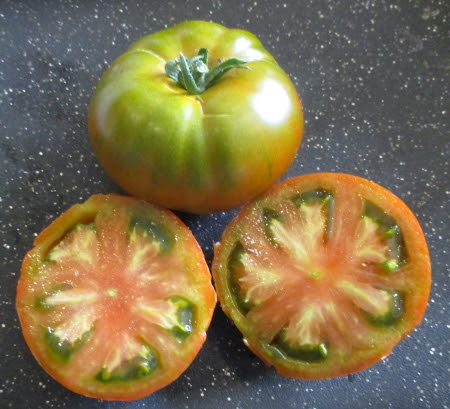
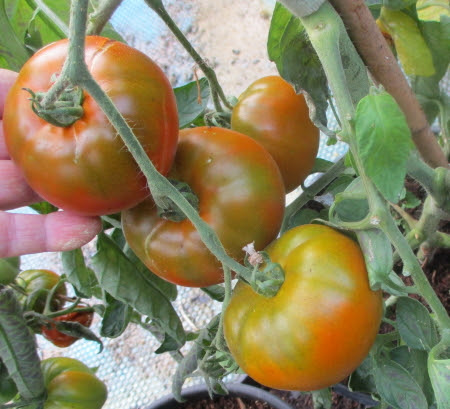
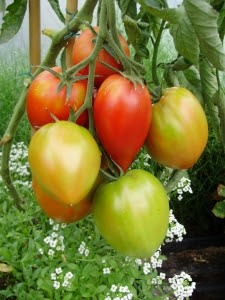
Two years ago I discovered at least two wonderful new varieties – which I shall now definitely grow for as long as I grow tomatoes. I normally wait until late autumn to recommend new varieties – but we seem to have experienced almost every season of the year over the last 3 months, from freezing to intense heat to almost freezing temperatures again – the last week having been only 3 degrees centigrade almost every night in the polytunnel. So I have no hesitation in recommending the two easy to grow, disease resistant, absolute gems pictured above which seem so far to have stood up to everything thrown at us! Both are sumptuously tasty, and have resisted heat stress of well over 40 deg C for weeks better than any other of the tomatoes growing here except the always fabulous Rosada. I only grew two plants of each this year, but next year I plan to grow more of both. Thorburn’s Terracotta is a beefsteak has been a juicy and aromatic new star turn in Caprese Salads – and from it’s meaty texture and flavour, I know that the delicious medium plum variety Baselbieter Rotelli will definitely dehydrate well, and also quite possibly freeze without collapsing. Both are open-pollinated varieties which can be grown either as cordons or semi-bushes with several stems, and this is useful, as I’ve been looking for a replacement for the F1 hybrid bush Chiquito. I prefer to save my own seed, and I want to grow all non-F1 hybrid varieties from now on – with the exception of Rosada which I shall endeavour to keep going from cuttings for as long as I can.
A gloriously abundant but hectic time in the polytunnel!
At the moment every day seems to be a mad dash to get some crops preserved – and to think up some new recipes for using the produce which just can’t wait another minute to be picked and eaten NOW! But time and the days are getting shorter for gardeners and polytunnel growers. We urgently need to think ahead to winter and possible shortages of veg later on. If you haven’t already got more than enough seedlings to fill your tunnel or greenhouse for the winter, then sow some more while there is still some chance that they will make enough growth to give you good crops over the winter, or you won’t have any until early spring. I always think that it’s far better to have too many in case I have a disaster with one crop – rather than not enough. And if I end up with too many seedlings, surplus to requirements – then there are always plenty of delighted recipients! I’ve already sown crops like Sugar-Loaf chicory, kales, perpetual spinach beet, and chards etc which I find so useful over winter, and I’ve also rooted lots of new watercress plants – but there are still plenty of faster growing crops you can sow now that will give you useful crops this autumn, as well as continuing on through the winter if we have a mild one. With our winters having been so wet over the last few years, I’ve tended to rely on the polytunnel more and more as the most reliable source of fresh winter food – particularly salads. I’ll be sowing more of those this month.
Before our supper every evening – I like to mindfully say the ‘grace’ which was repeated parrot-fashion, as fast as possible, before every meal while at school – but which now has so much more meaning….. “For what we are about to receive – may we be truly grateful” – Because we truly are so grateful to Nature for her abundant generosity, and to all of the wonderful creatures which help us to grow such vibrantly life-giving food.
Growing New Potatoes for Christmas
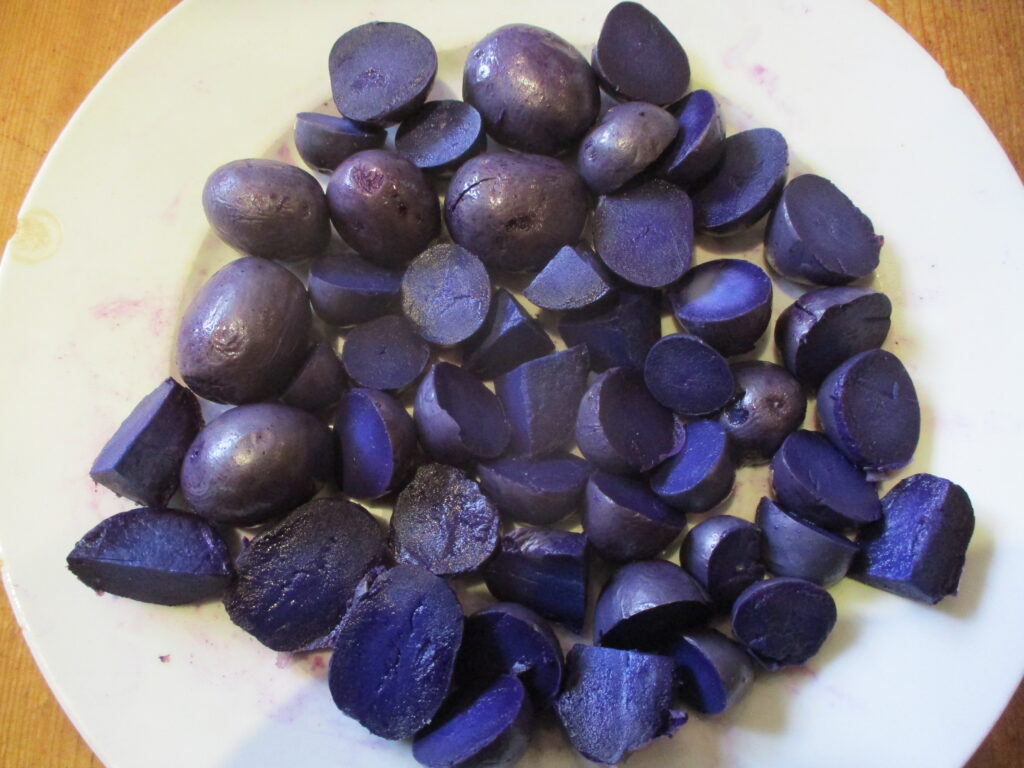
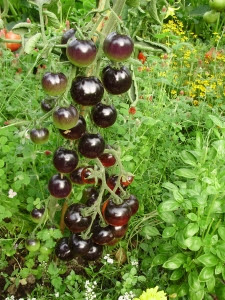
This spring I got a new purple-fleshed potato called Bleuet from Fruit HIll Farm. It has a stunning, deep indigo-violet colour, firm texture and great flavour. It is definitely one I shall grow from now on. Although it was planted late, so only produced small tubers, they were absolutely delicious, with a very impressive colour and texture. I only planted a few pots of it – none in the ground, as I wasn’t sure when my foot and ankle surgery would take place, and if I would be able to cope with getting more ground ready this year. But I have saved a few tubers from those which arrived from Fruit Hill Farm, and as it is an early variety, I’m going to try growing some of them for Christmas. It will be interesting to see how they do.
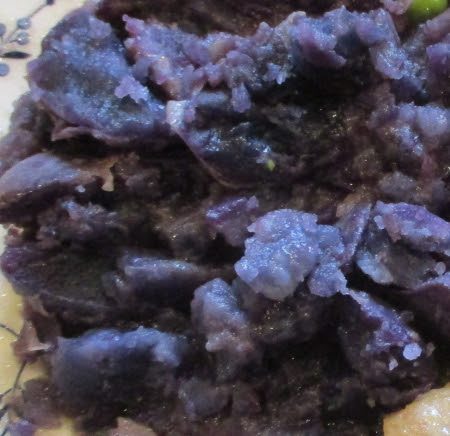
I’ve already potted up some potatoes for Christmas, and I’m repeating this advice in case you didn’t read it last month. This year I grew all of my potatoes in pots large and small again and none outside in the ground. This was because the surgery for my dodgy ankle was postponed again due to Covid19, and I wasn’t able to get enough ground ready early enough, so we’ve eaten a lot of those already. The only potatoes which I did plant in the ground were planted in the polytunnel, I planted just one row of the healthy, anthocyanin-rich, maincrop variety ‘Blaue Anneliese’ down one side of one of the raised beds. I can’t tell you how impressed I am with this new potato from Fruit Hill Farm in Co Cork – it’s a wonderful variety – and is without doubt the best-tasting and best-textured blue/purple variety I’ve ever grown. It’s fluffy when just cooked, and yet oddly enough – waxy and firm when cold. Not qualities usually found combined in one potato, but which make it very useful. It makes fabulous potato salad, wonderful saute potatoes and deliciously fluffy purple smashed potatoes – what more could one ask of any potato?
In addition to that though, so far it’s also the healthiest looking, and clearly the most disease-resistant of all the purple potatoes I’ve grown all the 40 odd years I’ve grown them! It is still growing so strongly and looking so healthy that I’m leaving it be for now, until we’ve eaten all of the rest in pots. It’s more than happy to be left alone, with just an occasional careful watering at the roots and never wetting the foliage, which would cause blight. At this stage it has already covered the entire bed and is now half covering the main centre path on the opposite side of the bed, and still looking astonishingly healthy again! I could really do with the space to plant some autumn and winter crops now – but far be it from me to upset a potato which is clearly so thoroughly still enjoying itself at this time of year! I think I shall leave it to grow for as long as it wants to – as an experiment. It will be interesting to see if it finally goes down with blight – although the Fruit Hill Farm website said that it is resistant to late blight. I usually lift all my potatoes before the end of August because rodents often become a problem, and I doubt it will be resistant to them!.
You can use any sprouted potatoes to plant for Christmas potatoes, as all of them will grow, but first and second early types are the most reliable if you have any left from early crops. Alternatively you can buy suitable tubers for growing Christmas crops from garden centres now – although these may not necessarily be the best-flavoured types. These are just tubers which have been kept in cold storage from the same spring planting seed tuber crops that suppliers would have been selling in spring. I do that every year with some of my spring planting tubers saved from the previous year – which by this time look shrivelled and often have very long sprouts on them – often 30 cm or a foot long! Long sprouts aren’t a problem though – I just lay them on their side and wind them gently around the pots – usually using 2 or 3 litre pots for these Christmas crops. They soon take off like rockets as they’re so delighted to finally be planted. I also normally save healthy some small, healthy-looking tubers from the current year’s early crops. Either way works just fine.
If I’m saving some of my early crop from the same year for doing this – I dry them off in the sun for a few days and let them go green, then I put them in the fridge to chill them for a week or so before planting in the pots. But I’m not sure doing that is strictly necessary. Potatoes are always keen to grow whatever the time of year – as anyone who has ever accidentally left a forgotten bag of them half-finished at the back of the veg cupboard will know! When they’re potted, just keep them outside for a few weeks somewhere where they’ll get good air circulation, to hopefully avoid late blight. Then bring them into the polytunnel as soon as any frost is forecast. From then on always cover them at night with fleece just in case, and don’t over-water or they may rot at this stage as they won’t be growing strongly any more – just ‘ticking over’. It may seem like a bit of a faff I know – but at Christmas your ‘new’ potatoes will be a real treat – and you’ll be so glad that you went to the trouble of doing them!
If the variety you are growing isn’t a first or second-early one, and isn’t ready in time for the festive season – then just as long as you don’t let them get damaged by frost, and keep covering them at night with some fleece – then they’ll just keep growing on after Christmas, through a few more weeks until they are finally ready. I’ve often done that depending on what variety I’m growing – and in fact they’ll be even more welcome in a dismal, dark January than they will be at Christmas – when there are so many other goodies to eat! I may even plant some more of the ‘Blaue Anneliese’ to see what they do – although they’re a late maturing, maincrop really, so I doubt they’ll be ready for Christmas. They’re also so vigorous that they’re not very happy in pots either – but I might put a few in very large tubs as an experiment. Apart from the obvious advantage of growing our own fresh food, especially varieties which I could never buy – experimenting is what keeps me interested in gardening. Finding new and better varieties and new ways of growing them is always exciting. When I stop being excited by that – then I shall give up!
Barely Controlled Chaos best describes the polytunnel right now!
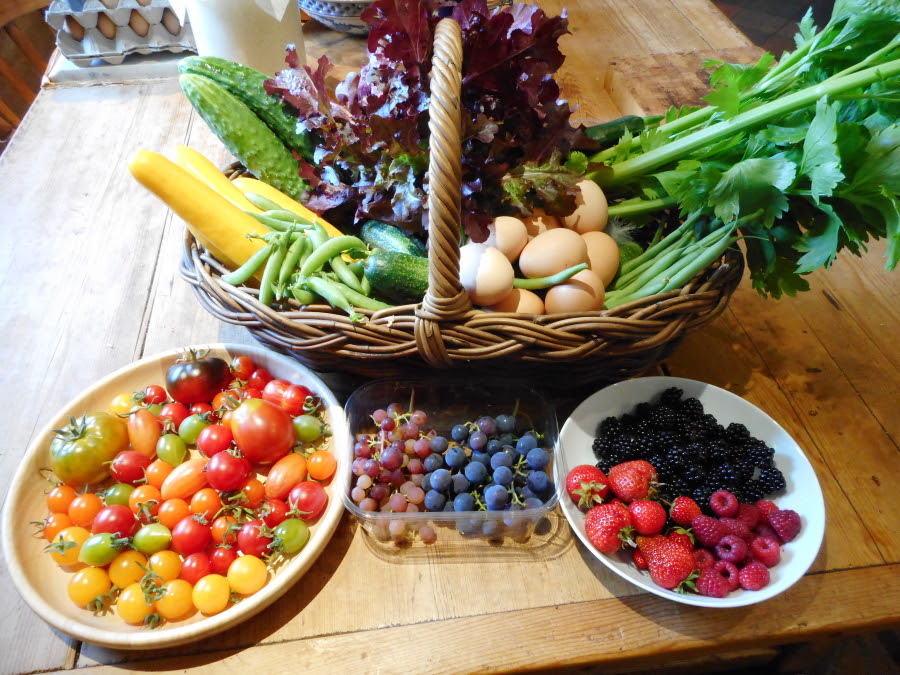
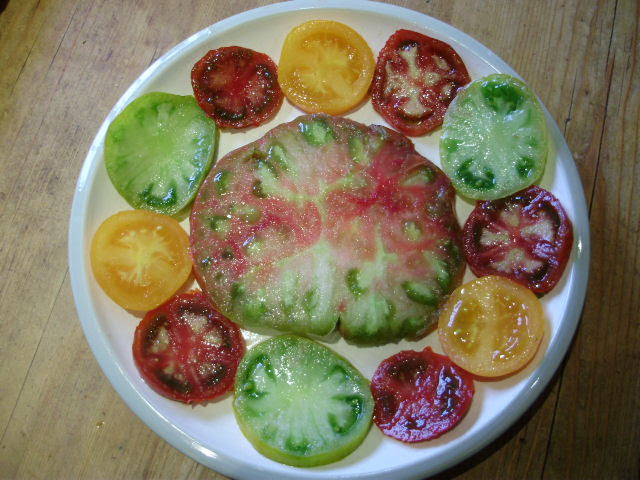
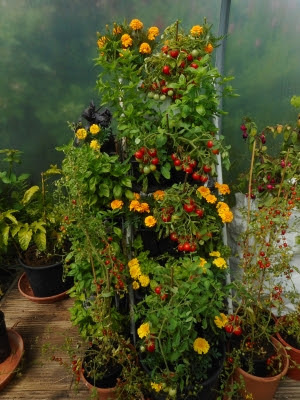
The picture above shows a small selection of some of the produce which I’m picking from my polytunnel now. Trying to take a picture that shows you the entire polytunnel would be absolutely impossible – you wouldn’t be able to see a thing, except leafy jungly abundance! It’s a veritable fruit and veg festival at the moment – stuffed with good things to eat in every possible corner – in every nutritious colour of the rainbow! And the kitchen is full of crates of produce being preserved for the winter – so that’s even more chaotic! The picture shows just how much fabulous produce it’s possible to grow in a polytunnel without using any chemicals – just by working with Nature and a bit of TLC. I love to take lots of pics at this time of year – it’s so nice to have them to cheer myself up in the depths of a long wet Irish winter! It’s also nice to have lots of produce stored for the winter. Anything that doesn’t get eaten fresh makes it’s way either into the freezer or dehydrator. There are 11 varieties of tomatoes in the picture, most of which are either made into my ‘Totally Terrific Tomato Sauce’ and frozen in portions (recipe in that section) – or just frozen whole for saucing later, if I’m short of time. Only Rosada and Incas dehydrate really well – but Blush is quite good too. And all the fruit makes a really special treat when semi-dehydrated to soft ‘leather’ stage into chewy fruit sweeties! They’re the only kind of sweets that get eaten here – with the occasional bit dunked into melted dark chocolate – now that’s serious decadence!
A few years ago, someone who had just put up a new polytunnel asked me if I could put on a whole page of tunnel photos as they needed some inspiration! Someone else asked me if I could walk around once a month and take a comprehensive video. While they were both brilliant ideas – apart from the time it would take which at this time of year I don’t have with so much work to be done – when I walked round my tunnels later with these ideas in mind and tried to take a few photos, I realised that it would be impossible to get a real idea of what’s going on in them without a lot of description too – which is what I’ve tried to do in my blog over the last few years, also in my ‘Late Lunch’ radio feature on LMFM, and more recently in my daily Tweets. You don’t need to have a Twitter account to see these – you can just enter through the Twitter window here – and then just go down through my timeline – which good friends of mine do who don’t want to be on social media.
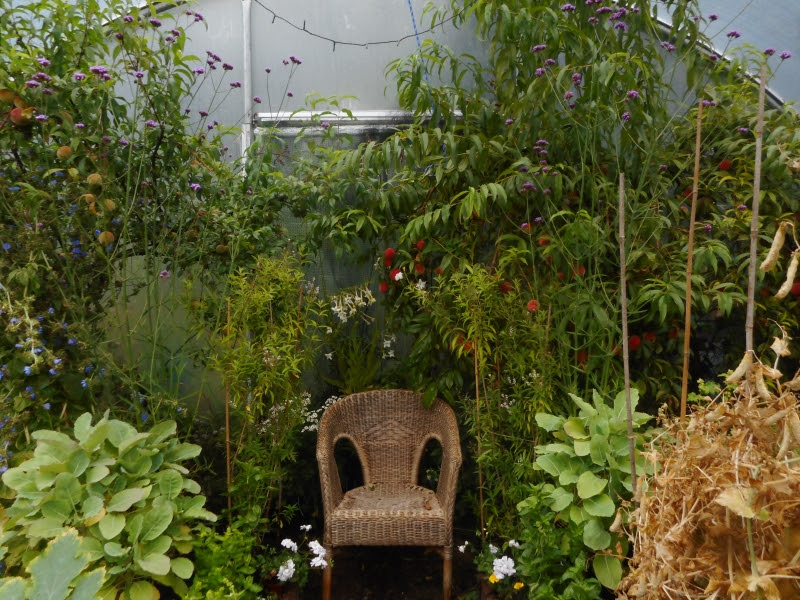
The picture above provides a small ‘vignette’ of my polytunnel potager garden – which is repeated in various combinations all around. I try to have a balanced ecology which echoes the garden outside and because of this it’s almost impossible for anyone to get a true picture of what’s really happening in there – especially at this time of year. Unless one examined it inch by inch – it’s so like a jungle that it’s impossible to see it all! So many things are growing through things, around things, underneath and up and over things – just as Nature grows things. There’s a riot of vegetables, fruits, flowers and herbs, with happily buzzing bees and butterflies everywhere – and also sparrows and other small birds flitting around hunting for insects to feed their broods. There’s even a few resident frogs.
It’s very hectic and really difficult to see anything too clearly, and to get a sense of just how much is really going on – one just sort of ‘feels’ the energy of it. There are no neat rows of crops with wide, uncultivated bare spaces in between, like one sees in so many polytunnels, because that’s not how Nature grows things. I think the best term for it is ‘controlled chaos’ – barely! It’s a fine line I know – and one has to take care that things don’t sometimes get smothered, or that by reducing air circulation too much one encourages disease. Science is now proving what I always knew in my gut from observing Nature – and that is that communities of plants are actually much healthier than monocrops of just one type of plant. Plants are just much happier growing together. I don’t give the way I grow any special title – like Permaculture, or No Dig, or Agroecology, because I don’t feel the need for a ‘badge’ – and because it’s all of those things and more. It’s just gardening with Nature without synthetic chemicals, exactly how Nature does it – and that’s what real organic gardening is!
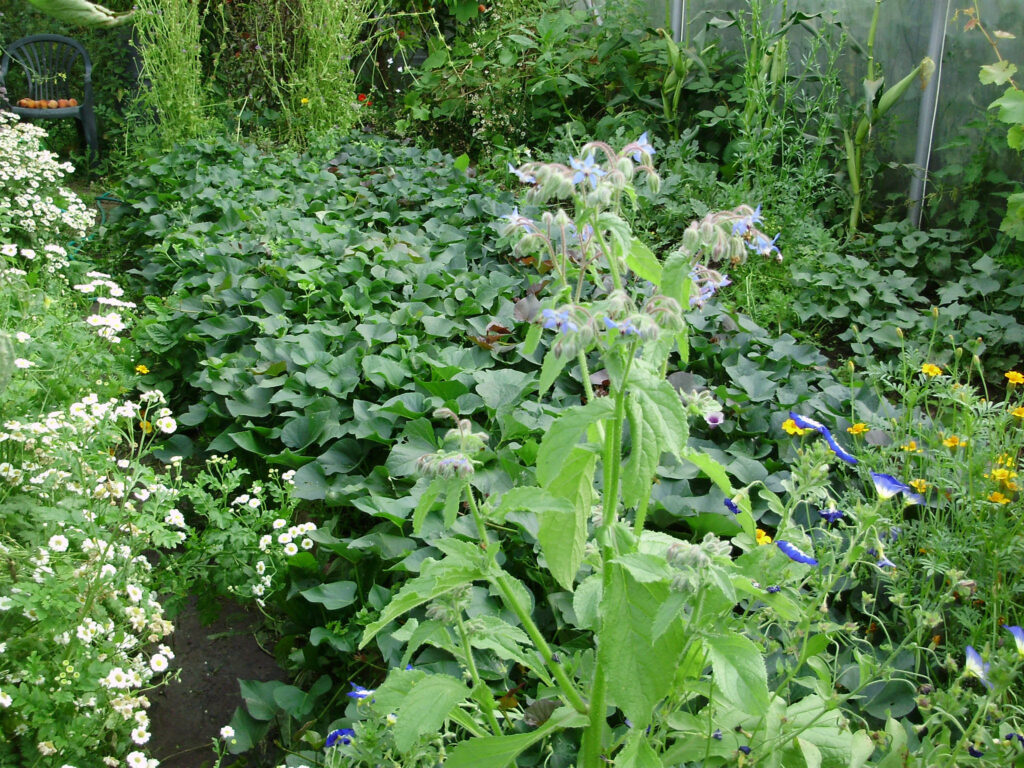
So often the photos of my vegetable beds look more like flower borders – but then that’s just how Nature loves to grow things – and that’s why the plants are happy and healthy! Sadly though, it does make it rather difficult to take photos that don’t just end up looking like one great big colourful and leafy blur! You can see what I mean about being hectic from the picture of the sweet potato bed above! They actually have very beautiful flowers too. So as a result – this month, my polytunnel looks like a very colourful jungle! But there’s a very fine line between trying to make every possible inch productive, or the whole lot descending into total chaos – and believe me – it’s not far from that right now!! Hardly any space to walk around the tunnel at all without tripping over or walking on something!
I’ve been growing with Nature in this way ever since I started vegetable gardening – for well over 40 years now. Before that I just used to arrange flowers from the wonderful garden where I grew up – and I think I’m probably still doing that subconsciously! It always just seemed a far more natural way of growing to me – and I love creating attractive and successful planting combinations. Back then it was called ‘inter-cropping’ or ‘catch-cropping’, and companion planting. ‘Permaculture’ enthusiasts have now re-named it ‘Polyculture’ – but they didn’t invent it – they’re just using a fancy new name for something good organic gardeners have done for centuries – and Nature has done forever! Nature doesn’t do ‘monoculture’ and neither do good organic gardeners! Over the last few years I’ve seen so many people announce they’ve discovered so-called ‘new’ ways to garden – with either very inventive new names, or using old names forgotten except by older people. I have a huge collection of old Soil Association magazines going back to long before I was born and they’re utterly fascinating. They knew about the benefits of soil bacteria back then – even without the benefits of modern electron microscopy!
For instance there was a debate about the merits of ‘no-dig’ way back in 1947 – and the inter-planting of maize with cover crops like legumes in the former Rhodesia was nothing new – likewise ‘no cultivation’ and ‘surface mulching’ of fruit. Equally fascinating was the fact that camel dung was not used in Mongolia!! I would love to have been able to ask “why not?” Seriously though – there’s nothing new under the sun and I often wish that the people who originally discovered and wrote about different ways of growing things were actually given some credit for their original ideas – rather than others claiming to have invented it and giving it their own name!
Lady Eve Balfour, H. J. Massingham and Lawrence Hills may not have had the advantage of all the modern scientific instruments that we have now – they just did what they felt was right in their gut – and observed their results closely. They knew then, as apparently so many people are only just ‘discovering’ now – that proper stewardship of the soil was the only sustainable way to grow healthy crops. They were constantly experimenting to find out how to mimic Nature and to grow crops better. It’s such a great pity that more people didn’t listen to them back then – instead of being seduced by the impressively fast results of the synthetic nitrogen fertilisers and other toxic chemicals which have been responsible for destroying so much precious biodiversity, and have caused so much illness, misery, biodiversity loss and environmental pollution!
In photos of other people’s gardens or tunnels, who perhaps grow commercially – there are often beautiful long rows of crops which one can take lovely clear photos of. Funny – but I don’t think that’s so beautiful! Neatly controlled – yes – natural – no! Some of them look more like monocultures – with great swathes of bare soil between the rows – and those people quoting the old-fashioned phrase that “we should be keeping the hoe moving”! – Sorry but that’s rubbish – science says different now and it’s also not the way that nature grows things. Nature never leaves soil bare as I’ve so often said before. It always covers it with some plant or other, unless it’s too poisoned for anything to grow at all! I rarely see those people growing flowers among crops either – as I do. Apart from wanting to grow my plants as naturally as possible – I also want them to have the highest nutrients possible – and you don’t do that by leaving huge areas of exposed soil. In addition – now that I don’t grow commercially any longer, I want the widest possible range of crops for myself and whichever members of the family happen to be around at any given time.
Things need to be a lot more flexible and I like to have a good choice available all the time. I like to experiment too, so I tend to grow quite short rows of many things, depending on how productive they are. I try to use every possible inch of valuable tunnel space either to provide food for us, or for the wildlife that helps to keep any pests under control, whether that’s outside or inside in the polytunnels. I try not to have large expanses of bare earth that I hoe or weed – which would obviously make it far easier to take nice clear photos. That’s not very good for soil though. Nature doesn’t grow things like that – and I try to replicate nature as closely as possible. I think this is why everything works and I don’t have any so-called ‘pest’ problems – even when growing in containers. Nature invented a food chain where everything depends on everything else and it all works perfectly. It has a beautiful equilibrium. It’s only when man intervenes with chemicals that some species are wiped out, others get the upper hand and then perhaps become what we humans have termed ‘pests! I try to mimic Nature by growing as many things together as I can, as naturally as possible.
Here on my blog I try to show people that you don’t necessarily need a large garden or an allotment, to be able to grow some healthy food for yourself and your family that can make a valuable contribution towards the household budget. That’s why I’m experimenting a lot more with containers and growbags as I explain above. I also try to convey that ‘growing your own’ shouldn’t have to take over your life either – and that it is possible to fit it into a normal busy life full of the other interests that we all have. Organic gardening is only part of my life, although it’s a very important part, as I try to grow all the fruit and vegetables that we need all year round. But I do many other things like most normal people. I don’t just garden and do nothing else – so time is also a factor. I have just the same amount of hours in a day as anyone else! The garden often has to look after itself for much of the time. I just dash in and out to water occasionally in the tunnels or to grab something for supper! I have to say though – that without the tunnels I’m not sure I would continue vegetable gardening! The challenges of increasingly unreliable weather would make it nearly impossible in our wet climate. With a polytunnel large enough to supply a family of four with a good range of food all year round costing probably less than most family holidays these days – I think they’re terrific value. I worked out years ago that if they’re used properly, all year round – they should pay for themselves in two years – if we’re eating the correct amount of fruits and vegetables we are supposed to eat in order to be healthy!
Aubergines, Peppers and Tomatoes

Aubergine ‘Bonica’Aubergine ‘Bonica’ (pictured here) is as usual cropping really well. The fruits look so beautiful it’s almost a shame to pick them!. Each of the plants has already produced 5 or 6 fruits and has loads of babies developing. Many companies sell the seed of this one and it’s the best variety I’ve ever grown – it’s thoroughly reliable and I now grow really good aubergines every year – despite our unreliable climate here in Ireland.
‘Bonica’ came out top of the Royal Horticultural Society trials about 10 years ago and it’s easy to see why. It’s currently producing huge, beautiful minimum 12-13oz plus aubergines faster than we can use them – some weigh over a pound or around 500g! I freeze any that I don’t use immediately. They’re sliced – brushed with olive oil and frozen on sheets of grease-proof paper, then bagged for winter use. They can then be oven roasted straight from frozen. By the way – I never salt them – it’s not necessary with home grown ones and ruins their sweet, almost meaty flavour. Considering that even non-organic, chemically sprayed ones are over a euro each at least in some supermarkets – they’re well worth the extra TLC and they’re very happy in the recycled coleslaw buckets as you can see from the picture here! Aubergines need careful watering – never soaking them near the stem as they are very susceptible to stems rotting near the base. Peppers need the same careful cultivation and watering for the best results.
We always look forward to our first Caprese salad of the year with huge anticipation! Although our absolute favourite for this is Pantano Romanesco – which has no equal for flavour if it gets plenty of sun – I discovered a lovely new variety of tomato a few years ago. It’s a heritage variety called Moonglow which came from Simpsons seeds and has a lovely fruity, quite unusual, almost ‘apricotty’ flavour. We really enjoy it with Green Cherokee, Nyagous and with a huge slice of Ananas Noir in the centre of each plate – it looks almost too good to eat, as it looks so pretty – but we manage to force ourselves! Add to those the two new varieties I discovered this year which I talked about earlier – and our plates look just like an artist’s palette.
Our classic Caprese though is usually thick slices of juicy beefsteaks Pantano Romanesco and John Baer (a wonderful very early tomato with a split personality which produces some beefsteak-like and some classic medium tomatoes with a fabulous flavour). With it we have some really good yieldingly-soft buffalo mozzarella (pizza standard cow mozzarella just won’t do for this salad!) – dressed with my pesto dressing (a frozen pesto cube dropped into in more olive oil which thaws and dilutes it), a few grinds of black pepper and prettified with some shredded basil. Accompanied by some crusty home-made ciabatta still warm from the oven, to mop up the juices, it’s heaven on earth. One is instantly transported to the Med.! What more could you want? You can close your eyes and feel that you’re perhaps sitting in a little sun-warmed piazza somewhere in Italy, in late evening – and almost imagine that when you open them again you will see a gilded campanile silhouetted against a cloudless turquoise sky!…………Ah well…….dreams cost nothing!

I can’t believe that it’s already time to ‘stop’ the tops of the tomato plants. This year seems to have flown. When the plants have reached the top of the 8 ft bamboo canes which support them – normally when they have 7 or 8 trusses on them depending on the variety – I cut the tops off. I like to keep a bit of air circulating above the tops of the plants, so I don’t like to let them grow right up to the roof of the tunnel, as many people do. Usually the plants won’t ripen more than eight trusses anyway in a polytunnel in our climate here, because the air becomes more humid and the light much less as autumn approaches. In a tunnel which is only growing tomatoes, where you can keep the air much drier for them, you could allow them to carry more, by training them up twine which you let out, lowering the stem along diagonally – I used to do this when growing commercially. But most gardeners want to grow a wide range of different crops in their tunnels at the same time – this makes it more difficult to keep the air as dry as possible for crops like tomatoes, aubergines and peppers. Some other crops like cucumbers and melons need more watering – making the air much more humid, so it’s really a bit of a juggling act. At this time of year it becomes even more important to be really careful with your watering – watering in the mornings if possible to allow the atmosphere to dry out a bit – rather than watering late in the evening – particularly when a cold night is forecast – as this will hasten the demise of most tender summer crops! Careful watering will ensure they last that bit longer without disease.
I walk round at least two or three times a week now with a large bucket, cutting off any damaged, diseased, or dead foliage (the 3 D’s), or whenever I see something as I’m picking crops. Using a knife or scissors for a clean cut – otherwise stems may tear and then let in disease. This is really important. Diseases, particularly grey mould (botrytis) can spread like wildfire on the muggy, gloomy grey days we often get in August here in Ireland, even with all possible ventilation. It’s a particular problem where we live – where we can get a sort of low cloud/sea mist for days on end, which often only lifts for an hour or two around lunchtime, often descending again around 3pm. Tomatoes really hate that sort of weather!
The continental beefsteak types are the most vulnerable, and must be watched really carefully. I actually pick them with secateurs to avoid tearing the truss stems. Take a look at them every day and pick off anything dodgy-looking immediately. You’ll often see the shrivelled dead flower petals still clinging to the end of the swelling fruit, it’s a good idea to gently pick these off, it is a bit fiddly – but if you don’t – disease can often start there and very quickly turn the whole fruit mouldy and rotting, and then spread to the rest of the truss. The trusses need to be kept really clean and free of any detritus. As I’ve said before, they are not really that happy growing here in polytunnels, they’d really much prefer the hot summers and brilliant light of the Med. – but their wonderful flavour makes a bit of extra TLC worthwhile! That thought keeps me going through the winter. You can’t buy a tomato that tastes anything like them anywhere in Ireland – but they do bruise incredibly easily when properly ripened. The commercially grown types are bred for ‘travel-ability’ and shelf life – not tender, melting, luscious flavour! Basil is a bit fussy too, but if you’re really careful with watering, pick off browning or diseased leaves immediately and keep pinching out the flower buds – it should keep going well all summer.
Don’t cut off curling up tomato leaves unless they are discoloured or going brown, or grey and mouldy at the tips – curling up is normally caused by excess heat a couple of weeks earlier, or depletion of nutrients as the plants get older. Only take off the first couple of leaves below the ripening trusses to help improve air circulation – even if they are still green. The others further up are needed to help the plant to photosynthesise and to keep drawing up the sap. Keep looking for any side shoots which may still appear all down the stem. Be very careful with the watering in the whole tunnel now. Try to water in the mornings if possible, on a day when sunny weather is forecast, this gives surface moisture a chance to dry off before the tunnel is closed in the evening. Watch the weather forecast, try to plan your watering and don’t go soaking the whole tunnel thoroughly if wet dull weather is forecast for a couple of days. Try to keep the moisture content of the soil fairly even. Fruit may split if the roots have dried out too much and the plants are then soaked, and uneven, erratic watering can also cause ‘blossom end rot’ (where the fruit gets round black patches on the flower end) or the small fruit may even drop off altogether.
I feed all the tomatoes now, with a half strength feed, at every other watering, as the slightly yellowing lower leaves with paler top leaves can be a sign of lack of nutrients. The top ones should still look healthy and green. The ‘Maskotka’ bush cherry tomato in large pots is looking particularly hungry now, as it started cropping really well at the beginning of June. It’s a fantastic little cropper – every time I think it surely must finish soon, another flush of flowers appears! I think just one or two bushes would definitely keep one person in tomatoes for most of the summer- and could even be grown on a sunny balcony as they don’t make huge plants. They hang from the plants like bunches of grapes and the flavour is utterly delicious! I have had a few split ones – but this was my really fault as in the hot weather they’ve really needed watering every day, because of being in pots instead of the tunnel soil, and there were one or two days where I was very busy doing other things and just forgot! This year my stepladder garden is tomatoes and herbs – Basil and Oregano. It’s been hugely successful. This would fit onto any balcony or into even the tiniest of gardens! This year I used Tumbler this year on every step, and we were eating them in mid-May!
How to get a Second crop of Climbing French Beans from the Same Plants!
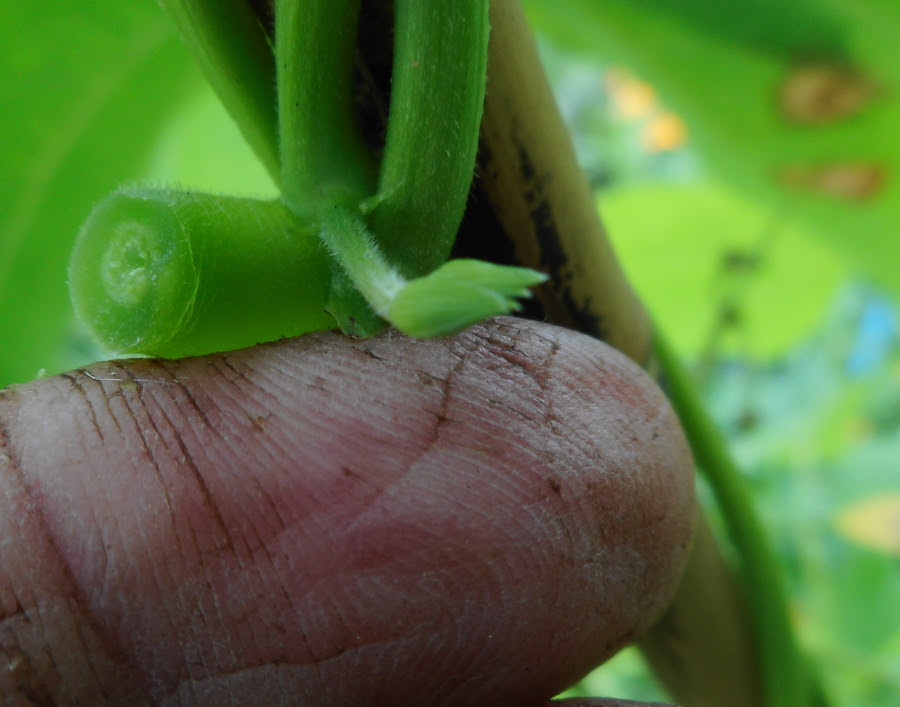
We’re starting to get a good crop now from the Cobra climbing French beans I sowed in mid-June. I normally start them off much earlier, but many sowings this year have been delayed due to my dodgy ankle. I keep picking them regularly, because French beans will quickly stop producing more if they get too big and stringy and start developing seeds. If your French beans have just finished cropping, and you don’t want the ground immediately for something else – I have a very neat trick you can use to fool them into producing a second flush of beans! Carefully strip all the leaves completely from the plants, snapping them off with your finger and thumb just where the leaf stalk joins onto the stem. They will do this quite readily. Then give them a feed – watering them carefully (avoiding the base of the stem as usual), and give the wider root area a nice mulch too – avoiding the base of the stems or they may rot. Within a few days – you should see tiny new flower shoots developing in the leaf axils. These will carry another later crop within a few weeks.
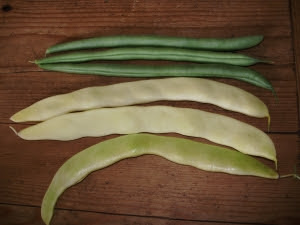
French beans are one of the most productive crops you can grow in a tunnel and well worth growing, particularly in Ireland, where our summers can often be wet – which French beans absolutely hate. They’re one of the very best crops for freezing too. Just loose freeze quickly without blanching, bagging up afterwards. The round podded, stringless variety ‘Cobra’, is totally reliable, incredibly productive and absolutely delicious. It’s actually an improved form of the old variety ‘Blue Lake’. Beans fit well into the rotation plan in a polytunnel, making a good break between tomatoes and cucumbers, and also fixing nitrogen for following winter salads and greens. I trialled a new French bean – ‘Golden Gate’ a couple of years ago. This was supposed to be really early, with good setting of flowers, very tasty and productive, ideal for tunnel growing. It was none of those things, in fact it was absolutely pathetic and tasteless into the bargain! So I won’t bother with it again – I shall stick to ‘Cobra’ as ever! Quite apart from anything else, ‘Cobra’ seed is about a third of the price (particularly in B&Q). Golden Gate was an attractive golden bean, that’s all – and a few people commented that it looked pretty!
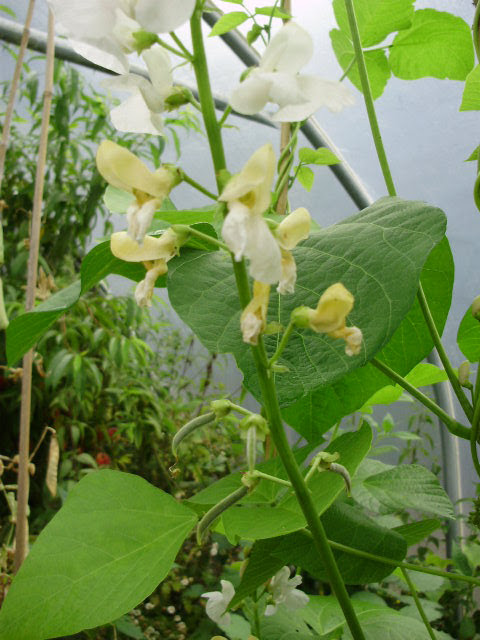
A few years ago I tried another bean experiment, which I now repeat every year! As you’ll know if you’re a regular reader – I love experimenting with different ways of growing. I also love the taste of fresh runner beans, but I live in a windy spot here – and every year, when growing runner beans outside, as soon as they’re carrying a full crop in August, along come the early autumn gales and destroy them. Literally blowing them to bits – no matter how well-supported they are! So I decided to try some inside! As white-flowered runner beans tend to set pods more easily, and I always have a lot of bees in the tunnel anyway, I thought it might be worth trying what was then a new partially self-fertile variety called Moonlight – bred by crossing a French bean and a runner bean – thinking they might be amenable to growing in the tunnel. Lo and behold – I was right! I know most people grow them easily outside – but we seem to get particularly strong ‘autumn’ winds up here in mid-August. Since there are always plenty of bees in the tunnels because I grow so many flowers in them – there is no problem with pollination and for the last 6 years I’ve had delicious runner beans from them. Moonlight is a stringless and really delicious variety – which I think has just as good a flavour as Painted Lady which was always my favourite – but sadly it didn’t really like tunnel cultivation.
Time to think about winter now!
In the midst of all this glorious abundance though – it’s time for a serious reality check! I just want to remind you that you really have to start thinking really seriously NOW about winter tunnel crops- if you want any! This month is your last chance to sow many of them if you want a really good selection of salads and other crops throughout the winter. Although there won’t be room for some time yet to plant most in the tunnel and it may also be still much too hot for them on any warmer days, if you don’t start sowing winter crops now – it will be too late by the time you actually have the polytunnel space clear for them. There is a marked difference between many crops sown now and the same ones sown in early September. Sown now – most things will start to crop well in late autumn and be productive through the winter – but put it off for another month and they may not start cropping until well after Christmas.
This particularly applies to calabrese (broccoli), Swiss chards, Sugar Loaf chicory and some types of lettuce. I generally do two sowings of all these veg. as a ‘fail-safe’ method to ensure I have them, just in case some disaster befalls the first lot I’ve sown. If they all survive successfully – you’ll find a space to fit them in somewhere and will be so glad of them in deepest winter! You can start sowing these in modules outside now (if you haven’t done so already) then bring them in as their space becomes available as summer crops are cleared. By the way – if you have any old freezer baskets never throw them out – they’re endlessly useful! At this time of year I use them to protect small seedlings which need to be outside, but are very vulnerable to slugs or cabbage root fly, which is still very active at this time of year! An old freezer basket covered with fine Enviromesh is perfect for keeping them out completely, so that you’re not disappointed by finding they have no roots, when you come to plant them in September!
Now is when good planning really pays off and it ensures that your polytunnel is as productive as it possibly can be all year round. To make the most of expensive tunnel space, you should always have something ready to plant as soon as a previous crop is cleared. There’s a list of what you can sow now in the ‘What to Sow in August’ bit as usual. It’s also a good idea to make a few notes now about this year’s crops when things occur to you as you go round the tunnel – what’s done well – what maybe needs a bit more space – or something you will do differently or maybe try next year, while it’s still fresh in your mind. Keep a notebook and pencil in there – you’ll forget by the time you get back to the house and something else interrupts your train of thought! This will help you to draw up an even better plan for next year’s crops. You’ll be ordering the seed for them this autumn if you want to get the best varieties as many quickly sell out.
Routine Jobs
Keep ventilating as much as possible, leaving doors fully open during the day if you can. I always close my tunnels at night as even at this time of year a strong wind can suddenly get up from nowhere on the odd occasion, particularly before a sudden thunderstorm – and if it’s from the wrong direction, it can rip off the doors and destroy the tunnel, as I’ve learned from bitter experience twice in the past! Closing the doors will also keep badgers and foxes out too – as they’re extremely fond of the odd bit of ripe fruit or an easy to dig up worm or two!
A little extra care and time spent now, will pay off hugely, by keeping all your crops going much longer into the autumn. What often happens is things can get into a bit of a mess when people are away on holidays, they look at it all when they come back, lose heart and then just give up! If you let things become a disease-ridden jungle at this time of year – and don’t deal with it – then you’re just storing up a lot of disease which you will get even earlier this autumn or next year. Good housekeeping now is absolutely essential! Be vigilant – it pays off! Clear any diseased plant material and also anything that isn’t productive any more – and plant something useful for the winter. Soil likes to be kept working – and even if you just plant hardy vegetables that you could grow outside – things like lettuce, winter spinach, kales and chards still be two or three times more productive inside instead of being blown around by freezing winter gales and rain outside.
If like me you have very raised beds either in your tunnel, you almost have to treat them like giant containers or pots, as they do need watering a bit more often. On the other hand, the crops do tend to be slightly earlier because the soil is warmer – and the drainage is so much better. I get a very graphic illustration of this sometimes when we get floods elsewhere and there is water running between the beds! They are also an awful lot easier on the back too – which is why I put in mine! Mulching really well does help too – as always – stopping evaporation, conserving moisture, providing nutrients and encouraging good worm activity. Preparing the soil well beforehand with really good homemade compost or other well-rotted organic matter, to provide lots of ‘sticky’ water-retaining humus, is most important too.
(P.S. I really enjoy sharing my original ideas and 40 years experience of growing and cooking my own organic food with you. It’s most satisfying and naturally also very complimentary if others find “inspiration” in my work……But if you do happen to copy any of my material, or repeat it in any way online – I would appreciate it very much if you would please mention that it originally came from me, as it’s the result of many years of hard work and often hard won-experience. Thank you.)